Wednesday, September 30, 2009

Time for cookies

I’m president of the SPO this year at my daughters school (it’s their PTA – just a different acronym.)
Anyway, we were in a meeting, planning the next several parent events we’ll be hosting and discussing food options. The general thought was that cookies were fine for afternoon activities, but for morning we should have something fruity/healthy and for evenings something savory.
MY opinion was slightly different. I will eat a cookie anytime.
Seriously – any.time. Wake me up from a dead sleep at 2am with a freshly baked cookie and I will thank you politely – then ask for more. I.love.cookies.
About a year ago I discovered a local bakery that makes the most amazing sugar cookies. Normally I’m not a sugar cookie fan. Give me peanut butter, oatmeal raisin, chocolate chip…throw as many extra ingredients in as you can. But sugar cookies? Boring!
These ones, however, are like heaven. Heaven with a touch of almond extract. Heaven with a texture that’s almost a cross between cookie-like and bread-like, with a thick layer of butter cream frosting that also has a touch of almond extract in it. If God eats cookies, (and I’m sure that he does!) then these are one of his favorites.
I spent a small fortune over a few weeks buying these cookies as rewards for myself. Rewards (?) you wonder? Yeah. It was like those Arctic Circle commercials – cookies were a reward for anything – cleaning the house, going to the gym, volunteering at school…
Unfortunately the cookies cost $1.75 each.
I’m not kidding. Ridiculous, right? But sooooo tasty…
So I began a mission to recreate the cookies. First I dreamed of things I could tell the head baker to make her give me the recipe, but abandoned that when I actually pictured myself making that phone call.
Instead, I made about 8 batches of sugar cookies, experimenting with different recipes until I finally got it right. I was hoping that by mastering them I would break their hold over me. Alas, that has not been the case. Still, at least now I can more than one without dipping into my savings account!
I made some last weekend and decorated them cute to take to a friends house. Look at that yumminess!

Now – when you make these (because you WILL make them, won’t you?) be sure to put a THICK layer of frosting on. Because the frosting is to die for.
Mandy’s Sugar Cookies
1 cup butter
3/4 cup sugar
2 eggs
1.5 tsp vanilla
1 tsp almond extract
2.5 cups flour
2 tsp baking powder
dash salt
Cream butter and sugar, add eggs and extracts, then dry ingredients. Refrigerate at least 2 hours, then roll out between wax paper with plenty of flour to about 1/3 inch thick. Cut into shapes. Bake at 350 for 10 minutes. Cookies will NOT be colored on top when they are done, but will be light golden on bottom.
Cool completely, then frost.
Mandy’s Best Buttercream
1/4 cup butter
3 cups powdered sugar (appr.)
1 tsp almond extract
1 tsp vanilla extract
2 Tbsp hot water
Beat until fluffy – continue adding sugar and water until frosting reaches desired consistency.

Enjoy!

Monday, September 28, 2009

Ghost Tree


I live on top of a mountain that is covered in a tree that we call Scrub Oak.
I wiki'd that term and found that it's kind of a blanket name given to several varieties of 'shrubby oak' - not some special tree that is only found here in Utah. Damn.

Anyway, these tree's are twisty and knotty and have very thin trunks. They don't get tall - instead they spread wide. Clumps of them cover everything.
Personally, I'd love to have them in my yard, they are so natural feeling! but they were bulldozed when my house was built. Which makes me feel sort of awful.
Anyway, some of my neighbors have them in their yard, and many of them have removed them. Didn't work with the landscaping, I suppose.
A house around the corner from me had 4 of them laying on their curb, dead and twisty and absolutely perfect for a Halloween Tree.

I mentioned it to the husband.
"I really want to take one of those tree's and make a Halloween thing with it..." I wheedled, nonchalantly.
Must have been too nonchalant. It didn't work. He ignored me. A week passed, then two.
Finally, I stopped on my way home from dropping the girl off at school, lowered my tailgate and threw the dead tree in.

At home I sprayed it off with the "jet" setting on my hose and let it lay on the lawn to dry. Then I sprayed it down with black spray paint.
After it was painted i used a hacksaw to cut the roots at the bottom off.
Oh, and next time I will cut the roots off BEFORE I paint - because I was covered in black spray paint afterwards.

I took all the dead flowers out of one of the large pots on my front steps, and jammed the tree in as far as it would go.

Then I made 4 cute little ghosties out of wooden craft balls and white quilters cotton.


(easiest thing ever - I just put little white hair elastics around their necks.)

I drew faces on with a sharpie.
One is happy, one is sad, two are surprised, or confused or...something.

Lastly, I took the piece of 1x4 I had left from the coat hook mirror and cut it in two - giving them both angled cuts to help them look more Halloween-y and spray painted them with Rustoleum Paprika. Then I made them say "Boo" and "Eek" and added some cutesy to them.

I love the way it turned out!

Tuesday, September 22, 2009

Coat Hook Mirror

You've seen these everywhere, right?

This one is from Target. It's called a "Pub Mirror" and it's $75.
Target's usually my go-to store for cute decorative items that cost a small fortune at the really fun stores like Pottery Barn or Pier One...
But $75 was too rich for my blood!

I had this all in my house - just across from the laundry room/garage entrance and it REALLY need something.

A coat hook mirror sounded perfect - especially since I obsessively check my teeth before I leave the house.

So I decided to make my own!
Here she is - turned out pretty cute, huh?

If you want to know how I did it, here's a quick tutorial.

I started with a $5 door mirror from target, a 1x4 and a 1x2 from the Home Depot (less than $3 for both pieces of wood) a can of Canyon Black Rustoleum spray paint and 5 hooks - also from the Home Depot.

The boards were to frame the mirror.
I cut the 1x2 into three pieces - two short ones for the sides (mine were about 13") and one long one for the top (mine was about 59 inches.)
I cut the 1x4 to fit along the bottom.
Then I sanded them and gave them a couple of coats of spray paint.

When the boards were dry I screwed the hooks into the 1x4. I eyeballed where I wanted the two end ones to be, then I measured to make sure the ones in between were evenly spaced.

Hubby picked the hooks up for me one night on his way home from work.
This is one of the things I love most about him.
I have called him and asked him to pick up the most random things for me on his way home...
lumber, paint, hardware, even sewing notions. He always says okay - asks just enough follow up questions to make sure he buys the right thing - and NEVER, EVER, EVER wants to know what it's for, what I'm doing now or how much "help" he's going to be required to give.
When he gets home he lets me show off whatever project I'm working on and acts excited about it. LOVE HIM.

Anyway, these are the hooks he chose and they are perfect. They were probably a bit more than I would have spent myself - but then again, he made sure they matched the rest of the hardware in the house (brushed silver) without me having to paint them - which was nice for a change. I think he spent $4 per hook, and he bought 5.

At this point I lay the mirror and it's frame out on the floor and realized I would need something to mount the whole thing on so that I could hang it on the wall. Duh.
Luckily I had a fairly large sheet of hardboard in the garage that was left over from the race track we built for the boys Birthday last month.
We cut it to size and mounted the mirror and frame using adhesive. Then we weighted it and let it dry overnight.
The next morning I covered the mirror with newspaper and blue table, removed the hooks and gave the whole thing one last coat of spray paint (the black of the mirror frame was not the same black as my wood frame.)
Once it was dry I put the hooks back on and used my staple gun to attatch wire to the back for hanging.


Here she is, hanging on the wall in all her glory!


Total cost:
Mirror - $5
Lumber - $3
Hooks - $20
Less than $30 TOTAL!

I already had the hardboard and the spray paint, but even if you had to buy those things they would be less than $10. Hardboard is CHEAP and one of my new favorite crafting staples :)

Wednesday, September 16, 2009

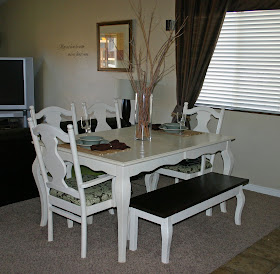
For the table


When I blogged about the table I mentioned that I was planning to build a bench and come up with a centerpiece for her...
Here they are!

I've never been a big fan of tables with benches, but this table was begging for one.
I planned to build one from the begining, though after the table was done I got a little nervous and started shopping garage sales for a bench I could refinish, instead of starting from scratch.
I never did find anything, and I'm so happy about that now!

The table came with 6 chairs, 4 of which I refinished with the table. One was in terrible shape - it looked like it had been used as a chew toy for a very large dog. I decided NOT to use it at my table.
Instead, I stole it's two curvy legs and used them for my bench :)
I also bought 2 retangular legs from the Home Depot.
To start, I spray painted the legs and the 2x4s that I planned to use for the base with Heirloom white, to match the table.
I decided I wanted a 2 tone look for the bench, with the base matching the table and the top being real wood. I bought a peice of 1 inch thick butcher block style wood from the Home Depot and had hubby cut it down for me (cutting with the grain, which is called ripping, is too scary for me!) I think the wood was about $20.
My husband makes fun of my wood staining. He says I never can just buy the color of stain I want - I have to mix them to get a custom color so that it can never be matched again.
It's not my plan - it just happens to go that way.
I stained my bench top with a Minwax gel stain in American Walnut. After my two coats had dried the color was really...brown. flat. not as warm as I had wanted.
So I took some Minwax liquid stain in Mahogany and rubbed a couple of coats over the top of the walnut. And it looked exactly like I'd envisioned :)
Once it was dry I applied 2 coats of polyurethane and 2 coats of polyacrylic, just like on the table. I wanted it to have a nice sheen to it, and to be well protected from all the abuse it was going to take from my kids.

I have a really nice bench in my front room that I flipped upside down and used for reference. I looked at it a million times during the process, and I was so glad to have it around!
I built the box for the bench out of 2x4's and attached it to the bench top using Quick Grip, a professional adhesive.
Then I nailed all the legs into the corners and added those angled pieces for support.
I taped off the edges of the bench top, flipped her upside down on the grass and gave the legs and box one last coat of heirloom white to cover the nail heads and black smudges from hammer hands.
(does anyone else leave black smudges from their hands that can't be washed away while using a hammer? Is it just me? Is it my hands? or my hammer?)

Oh, and while I was installing the legs I managed to chip a piece of wood off the edge of the bench. Since I didn't have an easy stain to run on to fix it (damn custom stain!) I used a sharpie to color it in.
And it matched exactly.
So I totally could have saved myself a bunch of time rubbing 2 coats each of 2 different color stains onto the top.
Next time it's sharpie for the whole thing! ;)

Anyway - on to the centerpiece!

Flip through a Pottery Barn catalog and you'll see dozens of vases filled with branches, twigs, leaves and blossoms...centerpieces that are often just for show and can't be purchased. When they are for sale they're a fortune.
DH pruned a tree in our yard a month or so ago while I was out. When I got home and saw it done I said (in a panic) "you didn't throw the branches away, did you?!"
Of course he hadn't. He knows me far better than that. Instead, they were neatly stacked on the front porch.
Easiest centerpeice ever - I just bought a big cylindrical vase and dropped the branches in as artfully as I could. I broke a few off here and there, to make them sit nicely, but that was the extent of the work.

I love the look of it even more now than I did with a chair on each side.
I don't know if it's because I know how much more useful it is (SO WONDERFUL for the kids!) or if it's because the dark wood top sets off the cream of the table, but it's perfection now :)
Done and done!

Sunday, September 13, 2009

Face Lift

I've always been a front door/front porch decorator.
I have cutesy wooden signs for each holiday that I've made with vinyl letters...typical crafty blogger stuff.

Lately everyone in blogland has given their front door a makeover, and I just couldn't resist the peer pressure.
Here's my leap onto the bandwagon.

Before pictures:
I thought I'd taken a good before picture, but I can't seem to find on on my camera. As a substitution, here are my cute kiddies on the 4th of July.

Notice the "Welcome" vinyl on the door behind them, the garland, the sign to their right, the flowers to their left...
It was cute - but it was old. And I wanted new.

Here it is after I'd taped around the edges (not wide enough, btw) and removed the vinyl and the handles.

First I washed it down good with water (didn't use a power washer this time, though I did that just a month or so before) and then I used black spray paint to get inside the indentations in the decorative panels. This was my own invention - I didn't want to be jamming my brush into those crevices any more than necessary.

After that I just bushed/rolled on the paint. I went with black exterior semi-gloss from the Home Depot. I didn't use a primer or anything - the paint that was on the door was still in really good condition.
It took 2 coats.
I applied another Welcome vinyl (this time in cream) in the center of the door and put a stainless steel kick plate ($25 at Home Depot) on the bottom.

I also took the railing down and spraypainted it black.

Then I made this gorgeous wreath and hung it a la' Nester.

Here's the end result (sorry, no cute kiddies in the picture this time!)

Tuesday, September 8, 2009

Dining Table

Some time ago I decided that we'd outgrown our dining room table.
I still loved the table, but it just didn't provide us with enough room. It was meant to seat 4, and we often have people over for dinner, parties, etc.
We needed more space.
So I shopped online to find something I loved.
Of COURSE this monster from Pottery Barn caught my eye.
$1000 for the table
$200 for the side chairs, $280 for the arm chairs.

So I pulled out my credit card and paid extra for super-fast delivery so I could have it by the weekend.


Yeah, right.
Actually, I started cruising craigslist and ksl.com (a local news stations classified site.)
I wasn't in any hurry. I had a tight budget and a clear idea of what I wanted, so I played it cool even when a couple dining sets popped up that looked like they might be perfect. If the seller wasn't willing to negotiate on price, I was out.
(Very proud of myself for that, btw!)
I found this set fairly early on, but wasn't willing to pay what the seller was asking.
The ad said they were selling the table because they were moving out of state, so I told them that if it hadn't sold by the time they were ready to go, I'd give them $100 for it.

(these were the pictures posted with the for sale ad)

A month later, it was mine :)
It measures 42x60, without the leaf, which adds another 24 inches to the length.
We shouldn't be outgrowing a 7 foot dining table anytime soon!
It came with 6 chairs, though the seller did warn me that one was "kind of beat up"

To be honest, the whole thing was "kind of beat up" - if "kind of" means "really".
Also, those lines which look like grooves in the above photos were not. They were painted on.
The table top required a lot of sanding. A lot.

There were some crazy-deep scratches in the surface of the table. I used some plastic wood to fill them in.

Luckily, I was going for a sort of weathered look. A Pottery Barn-distressed-chic look. It worked :)

Obviously those 90's era metal bars in the back of the chairs weren't going to work. Ick. Seriously.
I went after the backs with an assortment of tools. Screwdrivers, hammer and a variety of things that I'm certain I wasn't using correctly.
After the first one they came out pretty smoothly.

The whole thing got several (as in, like, 100) coats of Heirloom White Rustoleum.
On the table top I actually used Behr's new premium paint in a color whose name I can't recall, but which matches Heirloom White exactly. I rolled the paint on, then brushed over it to mimic how the wood actually was underneath - length wise except at the ends where it went width wise. Rolling it on first made it just the tiniest bit tacky, which meant I got a good amount of brush stroke in the paint. I was very fast and sort of slip-shod in my brushing - and it turned out perfectly, looks just like wood grain. (patting myself on the back.)
Over the paint I rubbed a minwax stain in Golden Pecan. I made sure to really rub it into all the distressed areas. After just a moment, I wiped it off. It gave the creamy paint color a lot of depth and made it really gorgeous.
Over the top I put 2 coats of polyurethane. Over the polyurethane I put 2 coats of polyacrylic. I love the way polyacrylic looks, and I have 2 kids. Extra coats of poly seemed like a good idea.

The table took about a week of sanding, painting, sanding, painting, staining and poly-ing.
The chairs were where the real work was.

Once I had them sanded, painted and stained I recovered their cushions.
At this point, we moved everything in from the garage and started using it.
I knew I needed to do something to the backs, but wasn't sure exactly what, and I wanted my parking spot back, so they got moved in backless.
Not comfortable, btw.

After a couple of weeks of discussing every possible solution, (and talking to several woodworking shops in the area, none of whom were helpful) I decided to do it myself.
I bought 3/4 inch MDF from the Home Dept and drew a template. Then I used a scroll saw (with Matt's help - I kept breaking blades!) to cut them out. Lots of sanding, some distressing, painting (etc.) later - and it was finally done!

The project turned out better than I even hoped.
I am as proud of this table and chairs as I have ever been about anything I've ever created.
Including my children.
For real.

After my mother in law had seen the table she found out I had refinished it.
She told me she had no idea - she thought it was from Pottery Barn.
I was so happy I barely refrained from jumping up and down.
Best. Compliment. Ever.
:)


Next Up: a bench for the kids to sit on (I'm terrified they're going to ruin my new upholstry!) and a centerpiece that will do my baby justice.

Linking up with ASPTL for DIY Day :)