Friday, October 30, 2009

I heart Bread

I made bread today.  My husband and I are invited to a Halloween party tonight, and we're supposed to bring something to share.  I thought about cookies or a dip, but I've been craving homemade bread and a party seemed like the perfect excuse :)


This is the easiest, most fool proof bread recipe ever, and it's DELICIOUS.  Like, seriously, ridiculously yummy.  I like it best with butter and honey on it.

To start, empty one packet of yeast into a large bowl.
Or, if you're like me and buy your yeast in this handy jar, use 2 1/4 tsp.


In my experience the key to great bread is warmth.  Keep it warm the whole time.  Starting with the water.
I use water that is on the hot side of warm.
Add 2 cups to your yeast. (or have someone do it for you :)) If you have bits of yeast stuck to the side of your bowl, stir them in to the water with a wooden spoon.


Give it a minute or two, then add 1 tablespoon of sugar to the water/yeast mixture.


Once the yeast is completely dissolved you'll probably have some funny looking swirl to the water, like this.


But, you might not.  So don't wait around all day for something that looks funny.  Just give it a couple of minutes and move on.

Next add 4 cups of flour and 2 teaspoons of salt.


Stir it up with a wooden spoon.  Make sure it's well combined, but don't beat it up, because dough that's been beaten up bakes into tough bread.  I'm sensing an allegory here...


Okay, back to that warmth thing...
When I start the bread I turn my oven on to 350.  As soon as it reaches that temp I turn it off again.
After the dough is all combined, cover it with a (preferably damp) towel and set it on top of your stove.  Crack your oven door and drape the end of the towel over the opening.  That will keep your dough nice and warm :)


When the oven has cooled down a lot I'll move the bowl (still covered) right inside the oven, too harness the last of that heat.


While it's rising you can prepare your baking pan.  Spread some foil onto a cookie sheet, spray it with cooking spray (I like the olive oil variety) and sprinkle (lightly!) with cornmeal.  All done!


(easy on the cornmeal - too much is BAD. Trust me, I know)

After an hour, it's time to punch the dough down and shape your loaves.  Once I've pulled the bowls out and closed the oven, I tun it back on to warm up again for the second rising.  'Second rising' sounds funny.

This is STICKY dough.  It took me a long time to figure out the little trick I'm about to share with you.  Most of you probably figured it out the first time you made bread.  I'm not that bright.

Flour your surface lightly, leaving some to the side to use as you knead.
Spray one hand with cooking spray, then rub your hands together like it's lotion.  Get it all over the backs, between your fingers, etc.  This will save you lots of frustration and tons of time picking dough off your hands.  That was the tip, by the way.


Punch the dough down and divide it in half.  Then put one half in your flour, dust the top of it with more flour, and knead it a few times.  Literally - just a few.  This bread does not need to worked much.
Shape it into a loaf and place it on your prepared pan.
Do the same thing with the other half.


Cover your loaves with a towel again, cracking that oven door for heat.  Let it rise for another hour.

Now it's time to bake!
First, though, melt some butter (say, 3 Tbsp) and brush it on the top.  Generously.  You'll be glad you did.


Bake at 425 for 10 minutes.


Then brush some more butter on it and reduce the oven temperature to 375.  Bake it for another 15 minutes. Brush it with butter one last time when it comes out and then TRY to give it 5 or 10 minutes to cool down before you dive in.


NOTES:
I've made this with half whole wheat flour, too.  It's good :)
If you add dried rosemary to the flour at the start and mix a bit of garlic powder in with your melted butter it tastes just like the bread you get before your meal at the Macaroni Grill.
Weather seems to have strange effects on this bread.  Sometimes the exact same amounts of ingredients yields a dough that looks completely different than todays did.  But it always turns out delicious!
Oh, and that gross looking thing in my little boys hand is beef jerky.

Here's the recipe, written out like normal people do it.

Peasant French Bread
1 package yeast (2 1/4 tsp)
2 cups warm water
1 Tbsp sugar
2 tsp salt
4 cups flour

Enjoy!!!

Monday, October 26, 2009

Step Stool


I have a 7 year old and a 3 year old - both of whom are too short to reach the sink in the bathroom without climbing.
I also have a couple of ugly old barstools.
So I decided to build a solution :)

First, I cut the legs off a stool, just under the first set of crossbars, making the stool a little less than a foot tall.


Then I put it in the kids bathroom and let them try it out for...well, WAY longer than I originally planned.  When I finally got back on track, I gave the stool a light sanding to prepare it for painting.


I wanted it to say something cute, and considered "step" "reach" and a few others, but eventually decided on "up"
I chose Book Antiqua for the font (classic, but a little more decorative than regular old Times New Roman) and printed it out with the font set to 350.
When I apply a stencil to wood I use a glue stick - it holds it in place nicely but comes off super easy.


After "up" was glued down, I gave the stool one coat of primer and two coats of white semi-gloss spray paint.


Then I did some selective sanding to give it a "shabby" look, removed the stencil and rubbed some stain over the top to darken the wood tone of the word.


Last thing was a coat of clear acrylic spray to protect it from too much more "distressing" at the hands of my children :)


P.S.
Ignore all the stuff in the background of the first picture...those are eventual projects :)

I'll be linking up to DIY Day at A Soft Place to Land!
and Met Monday at Between Naps on the Porch!

Monday, October 19, 2009

Tools of the Trade

I love my projects and I love my tools.
So I wanted to give them a nice home.

I found this at a garage sale for $5


I cleaned it up with 409 and a wire brush, then took the door off, the drawers out and removed the hardware.
I painted the body, which was rusted in many places, with grey rustoleum spray paint. The door and drawers got a couple coats of Sea Mist (seafoam?) green rustoleum.  The hardware got a fresh layer of silver spray paint.
And now she's GORGEOUS!


And all mine :)
I love that she is 2 pieces! So handy!


I have lots more tools to put in - just haven't had a chance to put them all in yet.
Bonus - she fits in the little end gap under the counter in my new laundry room!


Speaking of tool boxes...
I found this at a thrift store for $3
(another example of some woman going nuts with the craft paint and stencils!)


Sanded it down and painted it a dark reddish orange.
It was awful.
So I went back to grey!
Later, I stenciled on "Tools" with Heirloom White.  So cute!


This one's not being used for tools - I'm keeping my most current sewing project inside, instead. Right now it's full of tutu materials :)

Wednesday, October 14, 2009

Burlap Virgin No More!

Until I started stalking craft blogs I had no idea how cool burlap was.  Even after I started reading them obsessively, even after I started my own, I resisted the burlap trend.  I don’t know why, now…
No more!
Recently, I bought myself some burlap. And oh, the things I’ve used it for…

This gorgeous lamp shade – the project that started them all!  I bought just one yard – planning to cover this shade – and the leftovers have made ALL the other projects!


The “FALL” banner that’s so very popular right now!


Lined this cute tray


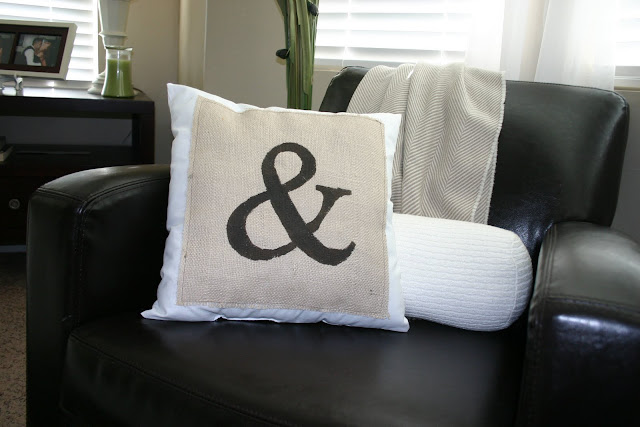
And finally…this ADORABLE pillow with a Burlap center. Originally I was going to monogram it, then this bit of typography popped into my head. Divine inspiration, I’m SURE!


Here’s the step-by-step for it – because it was SO tough! ;)

I used white quilters cotton for the base.  Sewed a square, leaving a 3 inch gap on one side open.

Then I turned it inside out, trimmed my burlap to the size I wanted it, and top stitched it on with brown thread.
Like I said, I had planned to put a monogram on this pillow, but as I sat down at my computer to find a font I liked, the ampersand popped into my head. I’m surprised this is my first punctuation project. As a former English major and wannabe writer, punctuation is one of my favorite things!
Anyway, I chose an ampersand. Printed it, cut it out and used it as a stencil with dark brown craft paint.


LOVE the way it turned out. I’m thinking about making a few more….an exclamation point, a question mark, even quotation marks would be darling, don’t you think?


So pretty on the bed!

Tuesday, October 13, 2009

My Autumn Home

I’m had this post sitting in Windows Live Writer for almost 2 weeks now. Sometimes I procrastinate the strangest things.  Anyway, I know I’m a bit late on this, as everyone else in blogland has already shared their gorgeous fall decor! but I figured it was still early enough to post – if i do it now!  Most of my autumn decorations (all but the Halloween ones, obviously) will stay up until Thanksgiving.

The only thing I don’t love about this time of year is the extra 5 pounds I’m carrying around because I’m not outside working in the yard and because I’m baking cookies 5 nights a week. Damn cold weather!

ANYWAY - I love decorating for Fall. It’s my favorite season, I love the cold air/hot sun combination, I love football, I love soups and stews and homemade bread…
Even more than all that I think I love the colors. Red, orange, brown and green – be still my heart!

So before it’s time to put all this away and pull out my Christmas decor (which always happens WAY too soon!) I thought I’d share some pictures of my pretty Autumn home.   I’m quite pleased with myself this year – even though many of the idea’s weren’t my own! I figure it doesn’t matter if I came up with it, as long as I pull it off!  You've seen the exterior, so here’s the interior.
My “FALL” Banner – in the kitchen, above my microwave.


Also in the kitchen, my pretty fall basket (currently filled with pumpkin bread from GraceViolet’s recipe! try it – it’s good!)


My new table settings/centerpiece (I keep the table set like this most of the time – I think it’s pretty, and it encourages me not to dump a bunch of stuff on it!)


The front room/entry way


The Family Room


A blanket and a sweater pillow cozy up the big chair :)


(to see my PB sweater pillow post, go here)

The Hallway


The Master Bedroom


Again - sweater pillow and sweater throw say "Fall!"


Made this centerpiece (and added the fall branches to the one in the front room, too) after stopping on the side of the road with my multi-tool and cutting some branches off trees!


I seem to be adding things every day - but that's the majority of it! Happy Autumn, everyone!!!