Monday, November 30, 2009

Gingerbread Ornaments

These cookies aren't to eat, but they sure do smell good!
And they're adorable, aren't they?!


My daughters Brownie (Girl Scout's) troop entered a tree into the Festival of Trees this year.  The theme was Girl Scout Cookies :)
Each mom had an assignment, mine was to make Gingerbread Girl Ornaments.
This is what I came up with.

First, the gingerbread recipe I used is non-edible (see bottom of post for recipe link and tips.)
They bake up nice and puffy, then dry super hard. Oh, and they smell heavenly.
Once they were dried out I sprayed them with polyurethane. I'm not sure how necessary this step is, but the Festival Rules required it.
I painted them with craft paints - SO much easier than frosting!

Here we go!
Mix up your dough.


Wrap it in plastic wrap and refrigerate it for at least 4 hours. Mine was in the fridge overnight.
Once you're done refrigerating, divide the dough into 3 pieces and roll out to 1/4 inch thickness.
 

Use cookie cutters to cut out your shapes (this recipe would be great for gingerbread house walls, too!)


Use a straw to make a hole in each cookie before baking.


Bake at 350 for about 20 minutes.
Once all the cookies were done baking I placed them all back on cookie sheets and put them in the oven while it cooled off - to dry the cookies out a little more.
Then I let them dry for 24 hours.
This is when I sprayed them (front and back) with polyurethane.
I let them dry overnight, then painted them.


This was the hardest part - because I'm not a great painter.

I also made some for me and the grandparents - a boy and a girl gingerbread ornament for each of us :)
How cute is this little guy?


I have several left over for the kids to paint on the weekend.  These can hang around for ever without going bad!

Recipe Link
Tips: I used almost a full cup more water than the recipe calls for. It needed it!
The recipe made about 30 cookies, and my cutter was pretty big.

After the cookies were done I ended up using sandpaper to smooth the sides on many of them.
If I were going to make them again I would probably reduce the baking soda a bit - they got a little puffier than I would have preferred.

Linking up to...
Dare to DIY
Just Something I Whipped Up
and It's So Very Creative
:)

Wednesday, November 25, 2009

Turquoise Chair <3

I picked this chair up at the thrift store some time ago.


I couldn't resist the medallion on the back.


Or the legs <3


Well, that, and the $3 price tag.
(for reals this time - this is not a price I made up!)

I really wanted to paint it heirloom white.
REALLY wanted to.  But my first instinct is to paint everything heirloom white, and I'm trying to fight it.  Some of the time, anyway.
So for the chair I went with turquoise.
I brushed it on inside the house - the same day I did the buffet, actually.  I just went back and forth between them and concentrated on not mixing the brushes up.

After it was dry I took it back out in the garage to distress it. Paint fumes are fine, but I don't need turquoise dust all over my house!
I covered the seat in canvas - left over from my drapes.
It wasn't my original plan for fabric, but I LOVE the way it turned out.

Then I whipped up this little pillow to sit in the chair.  How cutes is that?!


And the medallion is FAB is distressed turquoise, isn't it?


Here she is, complete!


I'll be linking up to Transformation Thursday at The Shabby Chic Cottage.

Monday, November 23, 2009

3-for-1

I've already mentioned that this year I get to host Thanksgiving dinner at my house.
As with ANY social gathering, it's an excuse to find/buy/make something (or several somethings!) for the house.
This is a 3-for-1 post - three projects, all done in time for one event - Thanksgiving Dinner :)
It's long, but worth it (I think!)

Project #1


For a long time I've been lusting after all the gorgeous buffets/hutches I've seen being refinished all over blog land.
I have actually whined to my husband "I wish that window wasn't in our dining area! Then I could have a buffet!"
What a silly thing to wish for...fewer windows!
So I came to terms with my big beautiful dining area window, and set out find a buffet without the top hutch piece.  Last week I found this beauty.


She was marked $75!  Puh-lease.  I walked away, but kept an eye on her.
Several people stopped to look at her, but seeing the price tag, quickly walked away.
Then one man stopped.  Opened her drawers, rocked her back and forth to see how sturdy she was, looked inside her cabinets.
I felt assaulted.
So I waited for him to walk away and then rushed back to my baby.
Then I flagged down an employee, casually leaned against the piece (placing my hand over the price tag) and offered $20 for it.  The employee said okay, wrote up a "hold" tag and gave me my copy to take the the register.  As soon as she'd taped the hold to the top, I ran off to pay, laughing maniacally all the way,
Is that cheating? Do you think it's wrong that I sort of cheated the thrift store?  Because I'll be honest...I don't really feel bad about it.  Maybe a tiny bit.  I don't know - I figure she didn't HAVE to take my $20 offer...

Anyway, once I got her home I was pleasantly surprised to find her made of solid wood.  I considered stripping and staining, her, but she had a seriously glossy finish, and I had visions of myself working on this buffet until Valentines Day.  So I sanded, primed and painted her Parchment, by Behr.
Parchment is an identical match, by the way, to our beloved Heirloom White.  I purchased a quart of it in Behr's paint plus primer premium paint (wow, that's a lot of P's) back in June and still have about 1/4 of it left.  LOVE it, use it on everything!
The great thing about brush painting vs spray painting, is that it can be done indoors.
I sanded and primed this piece (spray primer, btw) in the garage, then moved it inside for the painting.  Two HUGE benefits to that - the temperature and the fact that my 3 year old is inside and I can supervise his destruction activity better if I am inside, too.
 

I loved the hardware on the piece - bonus! The handles on the door, especially.  I removed everything - even the hinges - and painted it all black.  So gorgeous.


Once it was dry, I selectively distressed it.
I LOVE how it turned out.  On Thanksgiving I'm going to cover it in desserts - I have 3 stands I plan to fill with yummies :)


Project #2


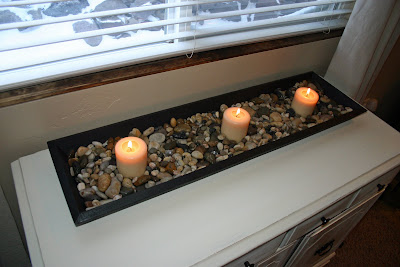
Months ago I found this strange tray...trough...wooden thing at the thrift store.
It had been craft painted.  My worst nightmare.
It was burgundy with a cream border. Inside the border were some abstract leaf-looking things.  It was a dollar, I think.


I bought it and left it in the garage pile for a while - to marinate (in my mind, not in a flavorful solution.)

Last week I decided it would become the base for a candle display/centerpiece.
I love candles this time of year.  I'll go all Summer without even thinking about fire, but October hits and all the candles come out. I'd love to have a fireplace, but we don't. For now, we have candles, instead.


I sanded and then spray painted the wooden thing with flat black - the wood grain really stands out on this and you can see it through the paint - I love that.


I already had a bag of polished river rocks, but I did buy 3 more from the dollar store.
I also bought three candles, 1.50 at Wal Mart.
That makes $8.50 for my candle display/centerpiece.
Beautiful and cheap! Like me! Haha! (totally kidding, btw)

Project #3


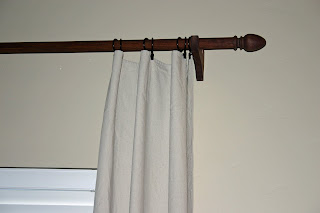
I've had some trouble with window treatments in our house.  It's taking me AGES to decide on what looks best.  I have most of the house settled now, but the great room area (kitchen, dining, family rooms) has still been posing problems for me.
Months ago I read on the Nesting Place that having a luxurious fabric someplace unexpected was cool and brought...something. I don't remember, to be honest. All I know is that I purchased some chocolate colored dupioni silk on clearance and put it in my dining area.  (there's some in my kitchen, too, but that's another story.)

(blech!)

Now, the Nesters advice is sound. She's a decorating genius. The fact that I recently decided I hated my window treatment/mistreatment has nothing to do with her - only with me.
This time around I decided to follow Traci at Beneath my Heart and her example.
Traci is a drop cloth connoisseur, and reading her post was extremely helpful.
This Pottery Barn image is what I was going for.


I love my drop cloth curtains SO much.
The texture, the color - everything!


Thank you, Traci, for the inspiration!


Whew! That's everything!

I'll be linking up to...
Kim's Dare to DIY party,
Cheri's It's so Very Creative,
Made it Monday at the Persimmon Perch,
Met Monday at Between Naps on the Porch
Make it for Monday at Cottage Instincts
and to DIY Day at ASPTL.


Thanks for stopping by!


Friday, November 20, 2009

Where do you spray paint?


This is, on many levels, very embarrassing for me.
I grew up the daughter of a car dealer.  My father loves cars like us craft bloggers love our hot glue guns and burlap.  His love is a lot more expensive than ours, obviously.
Some years ago, he built a 3 car garage in his backyard.  It's insulated, heated and air conditioned, wired with satellite television and radio, well lit and decorated. The concrete floors are sealed and clean enough to eat off.
This new garage is in addition to the 3 car garage that is attached to his house, which is also heated and air conditioned, equipped with television and radio, well lit, decorated, and possesses clean, sealed concrete floors.
The point is, I was taught to respect my garage more than I do.

Our garage is...
well, it's nothing like my dads garages are.
My husband and I both drive trucks, and only one will fit inside the garage.  So Matt parks outside. Because I'm a princess. (kidding! sort of.)
Not to worry, though, we've managed to fill the space with plenty of stuff.

(I love paint! don't worry - this isn't all of it...)

There's a big pile of thrift store treasures, large bins where we collect glass to recycle, and lots and lots of paint.  The winter is much more crowded than the summer, of course. Patio furniture cushions, large clay pots from the front porch, etc.


(there's a dresser in there that's going to be FAB!)

Every spring I spend a week cleaning it out, but it never makes much of a difference.

It's okay, though - I'm at peace with my garage mess (even if my dad does shudder every time he comes over!)
The BEST thing about it is that I can spray paint in there.
The floor is covered with strange geometric shapes in various colors from the overspray of all my projects.  It's like a rainbow, I love it.

This time of year, it's getting pretty cold here.
Yesterday it was 40 degrees.
I backed my truck out, set up shop, and got to work.  10 projects at a time - that's what I call a productive spray painting afternoon!


I've got some exciting projects coming up!
1. Will be a large centerpiece
2. Will be a fun candle holder
3. Hardware for a new piece of furniture
4. A curtain rod for my upcoming family room re-do
5. A picture frame - also for the family room re-do
6. A chair
7. A tray (this one is going to be fun!)
8. Behind the buffet - a piece of metal for my upcoming kitchen re-do
9. A buffet, for the dining room
10. A doll cradle - a Christmas gift for my niece :)

Where do you spray paint?

Monday, November 16, 2009

French Wire Basket

One more post...I'd forgotten about the Dare to DIY party over at my buddy Kim's.  Can't miss that!
(can you tell I'm sick today? I've done nothing but stare at my computer all day! The best thing about feeling like crap, lol)

When my Fall Pottery Barn catalog came I went nuts - marking almost every page, writing notes about things I liked the best.
This was one of my favorites.


The French Wire Chandelier, filled with fall bounty (the bounty is hard to see in this picture.)

It made my heart race, it was so beautiful.


We have very high, vaulted ceilings in our great room area, which is where my dining table is. A couple of years ago we hung a beautiful ceiling fan above our table.


I love it. It's very pretty, the blades have a distressed finish that I adore, and we use it non-stop for about 8 months of the year.  Right now, we are not using it.


(ignore the dust - I was!)

So I thought since I couldn't just HAVE the chandelier, maybe I could hang something similar to the the  basket portion from my fan.

I found a pretty wire bowl in black at a garage sale for $1.  Then I found this wreath at another garage sale for .75


I tore the wreath apart (made 2 more projects with it, too! Stay tuned for those ones!) and arranged some of the bounty in the bowl, wiring some onto the outside, as if all the loveliness was spilling over.


Then I twisted on some black wire to hang it from the light bowl of my fan.


(Dusted while I was up there, too)


LOVE it.


I'm hosting Thnksgiving this year and I am excited and THANKFUL to be able to have our family at our house for my favorite holiday.  I have lots of special plans for centerpieces and food presentation, but this hanging basket was probably the most important thing to me.  I'm so glad Kim's party got my butt in gear so I actually got this done!


I'll also be linking this to DIY Day at Kimba's