Thursday, July 22, 2010

Pimp My Ride

Is that title offensive? Can I say "pimp my ride" on a craft blog?
It's done, now. If it shocked you, please forgive me :)

My little boy (Asher) is turning 4 in just a couple of weeks. Recently, I asked him what he wanted for his Birthday. He said he wanted a black car. To ride in.
Now, since he already has a cozy coupe AND a power wheels jeep, there was absolutely no need to buy him a new ride in vehicle.
But I'm a sucker for this face.

I had to figure something out.

So I made over his old Cozy Coupe.
Are you aware that this is the best selling car in America? It's popularity is astounding. This review, about it's attributes, had me rolling on the floor.

Anyway, on to the makeover.
Ash has had this car for almost 3 years, now. It was his Birthday gift when he turned one. He was delighted with it then, and has played with it non-stop since.

It was actually a little beat up...
Here it is, before:
 

To start, I disassembled it. I scrubbed the whole thing down and removed all of the decals - didn't want to be painting over stickers!
 

The drivers door (the one that opens) was cracked at the bottom - a result of my daughter standing on it to climb on top of the coupe. My husband used some sandable plastic epoxy to repair it. It worked REALLY well, filling in the cracks completely.
 

Then I gave it several coats of this paint

Rustoleum Direct-to-Plastic Spray Paint. No sanding or priming required. In High Gloss Black.

When the entire thing (including the undercarriage!) had been painted, I rigged up a cover for the body using an old sheet that just allowed the seat to show through. Then I painted it white - using the same type of paint.
 

Once all the paint was on I gave the car a couple of good coats of a sealer - Rustoleums Clear Top Coat.

Then I reassembled and started on the detail work.
I considered purchasing another set of decals from Little Tykes - the cost is VERY reasonable...until you add in shipping. I always have a problem paying 4X the amount of the product for the mailing.
So I improvised.
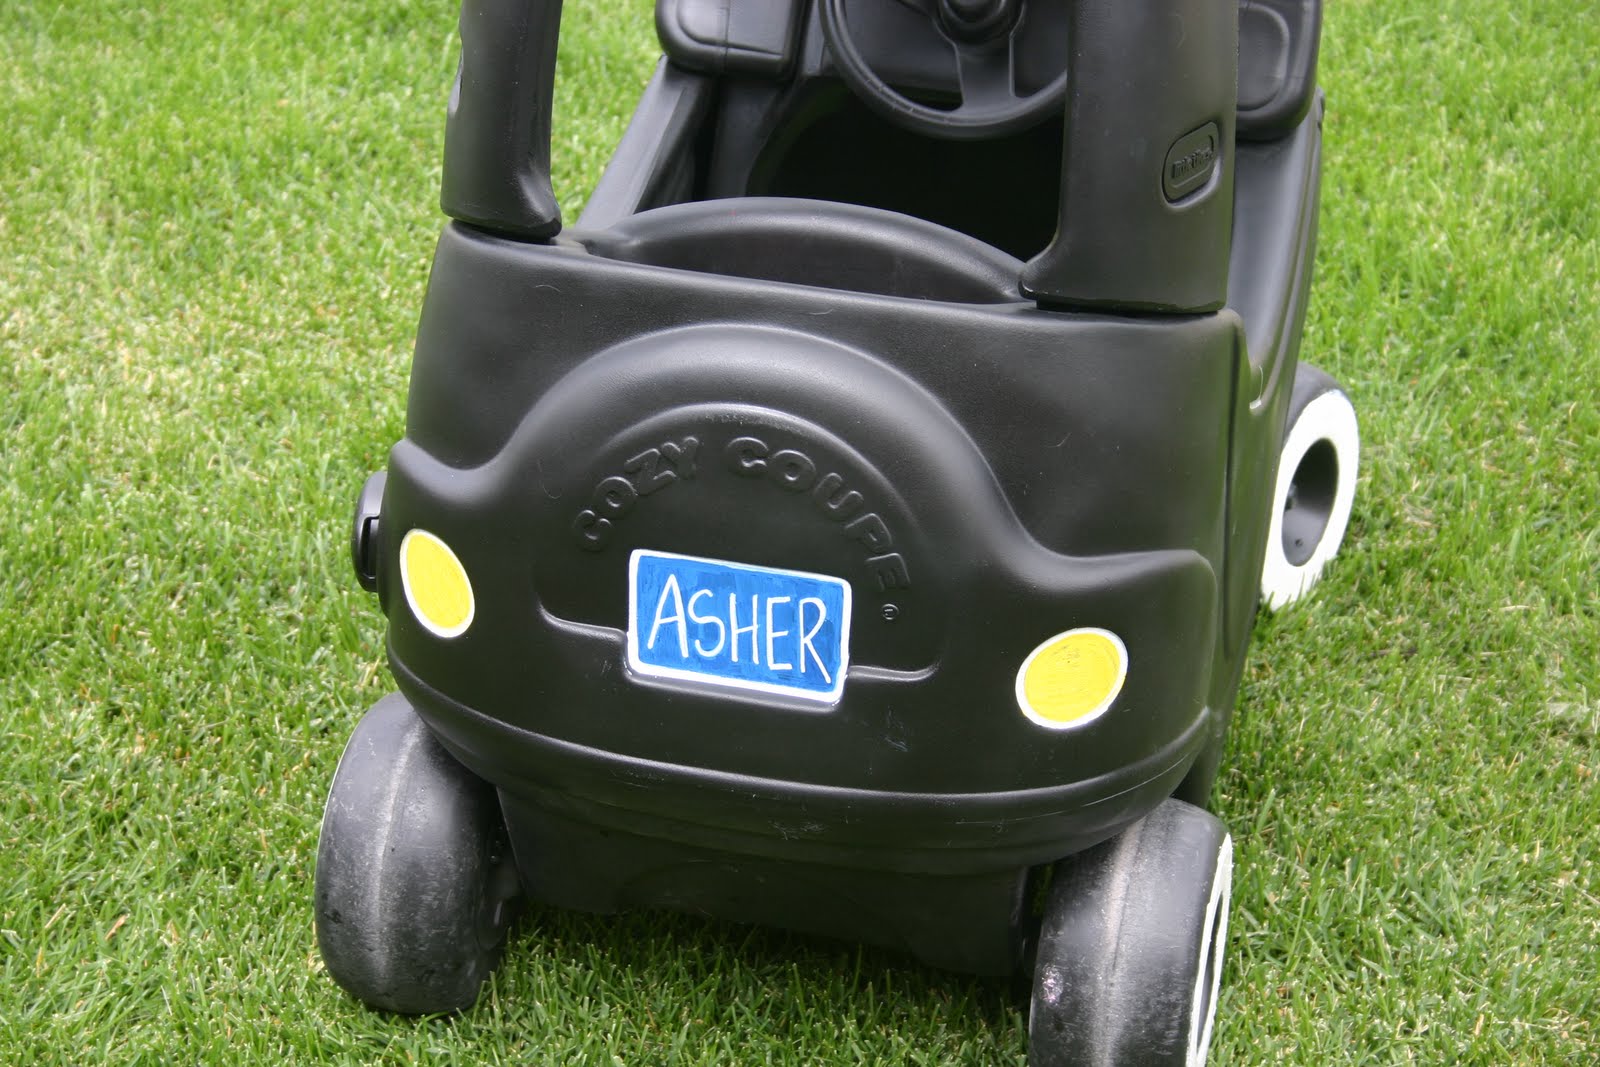
Using paint pens I drew on a personalized license plate and filled in the tail lights.

Then I used a silver sharpie to give it a grill, some door handles and to outline the ignition.
I really wanted to give it a speedometer or a radio on the dash, but with the top of the car back on I just didn't have a good angle to draw it with.
 

Last, but not least, I gave the coupe white-wall tires. Ash requested them specifically. I actually used wall paint on this part - mostly because it was easiest!

After all the details were drawn on I gave one more coat of clear. And then a few more coats of clear.
I'm worried that my makeover won't "stick" - the paint scratched off quite easily in the beginning. I had to touch up quite a few spots...
However, the longer it's on there, the better it seems to be doing. Hopefully it will eventually become part of the plastic :)

My boy loves it - and it's much more to his taste now. A classy black coupe with white wall tires feels so much more grown up than the red, yellow and blue original! LOL
Here it is...all pimped out :)


Linking up to...
Transformation Thursday at the Shabby Chic Cottage
Strut Your Stuff at Somewhat Simple
What Are Little Boys Made Of at Seven Thirty Three
Get Your Craft On at Life as Lori and
Look At Me at Fun to Craft

Monday, July 12, 2010

Spa Wrap/Cover Up


My daughter, Tessa (who just turned 8) and I are leaving for Girl Scout Camp today!
It should be an adventure!!!

I wanted to make her something special for camp. A little accessory or souvenir that she'd always associate with her first time at camp. I settled on a spa wrap/cover up.
Our camp has a lake, and the girls will be swimming.
I believe the showers are communal, as well. So her little wrap will be functional as well as fun!

To start, I scoured the internet for a design I liked. I found this one, from Centsational Girl, and LOVED it. The ruffles were just too perfect for my little girly-girl.  Eventually I may do what she did and make one for myself, but for now I only had time to make the one.

This is a project that's been in my head for some time. Last year I bought a set of towels on clearance at Target with this project in mind. They were part of the '09 College Collection and I got 2 bath towels, 2 hand towels and 2 washcloths for $3.24. Score!
I started with my cheap towels and a scrap of fabric I had in my stash.

I cut the fabric into strips (about 4 inches wide) then folded it in half, lengthwise, and ironed it flat. Then I folded it up about every inch or so and ironed those folds flat, making faux pleats.
Then I sewed my pleats down.

Next I measured my daughter and cut the towel accordingly. My 8 year old is kind of tiny, so the regular size bath towel was quite large on her. I ended up cutting about 18 inches off one end, plus the finished end from the other side.

I folded the top down about 2 inches and sewed it shut, creating a casing for my elastic.  I measured my daughters chest, subtracted 2 inches and cut the elastic to that length. Then I put a safety pin on one end of the elastic and sent it through the casing, but not all the way. I sewed the other end into the towel.
Then I sewed the ruffle onto one end of my wrap.
Next, I measured the length on my daughter and hemmed the bottom of the towel (after cutting about 2 inches off.)  Originally I wanted to give it a ruffle on the bottom, but I was running short on time and decided against it. I can always add one, later :)

I used one of the washclothes to make a pocket, next. I decided how big I wanted it and cut it down to that size. I left the hem from the cloth on the bottom, and left the top raw, but I ironed the two sides in.
Then I added a ruffle to the top edge and finished it off with a piece of double fold bias-tape.
 

I top stitched it onto the wrap.

This is when I finally finished the elastic. I waited until the end so I'd be working with a flat piece for as long as possible.
First, I threaded the safety pin the rest of the way through the casing, then I pulled the elastic tight as I sewed from the finished edge to the unfinished edge. I did it twice, the second line just a few centimeters away from the first.
Then I hemmed the unfinished end of the wrap.

I added two sets of velcro to the wrap, so that it would stay closed on her.


Then I added straps (using the hemmed pieces I had cut off earlier) so that it would stay UP on her.

And that was it.

I love how it turned out. She looks adorable in it and LOVES it. We leave for camp in two hours - hopefully I'll get a cute picture or two of her in it in a real setting! For now, here she is, photoshopped into post-card form :)

Linking up at...
The Girl Creative and
Raising Memories

Thursday, July 8, 2010

GOAL!!!

My daughter, Tessa, played Spring Soccer for the first time this year.
She loved it, and was actually very good!
We had a lot of fun with it as a family and went to the park a few times to practice...
But practicing soccer is tough without a goal.

I checked out a mini collapsible goal at Wal Mart, but it was cheesy looking and so light that I figured (staked or not) it would fly across the yard if anyone managed to score a goal! Plus, it was $35.
I checked online and found a plethora of options - none for less than $40, plus shipping.

At this point I (of course) started to wonder about building my own goal...
I figured there HAD to be plans out there to build one out of PVC pipe. We have a large pile of PVC in the garage, left over from our sprinkling system.

Sure enough, I found several plans online.  This one, from This Old House, was my favorite.

I modified it a tiny bit and managed to build a goal for about $6!
Since my garage was full of PVC pipe, I didn't have to buy any of that. I bought a bunch of PVC joints (about $3) and 2 fishing nets from the dollar store.

The nets were the hardest part. The ones from the dollar store are NOT perfectly square. Actually, they're not any particular shape at all. They're sort of amoeba-ish.  So I started by tyeing one net on to the goal in as many spots as I could stretch it to on one end, then I did the same on the opposite side. In the middle I trimmed the nets where it needed it and tied the two of them together. I cut and tied for about 30 minutes and it was tedious - but the money saved was well worth it! $2 was WAY cheaper than I would have been able to buy any other net for.


Tessa will be playing soccer again in the fall, and this season her little brother will get to play, too!

We're all very excited - especially for practice at home :)
 

Friday, July 2, 2010

My Last Patriotic Project


Okay - this will be my last patriotic project for this year!
After all - the 4th of July is only 2 days away!

In Utah we celebrate the 24th of July, too. It's Pioneer Day - and we celebrate it in much the same way as we do the 4th. Barbecues and Fireworks and lots of red, white and blue. That makes it possible to stretch my Patriotic Decor all the way through August 1 :)

I needed something patriotic, but in a non-traditional (meaning not red, white and blue!) for my entry table.  Here's what I came up with.

I started with a scrap piece of bead board and am ikea frame (still in the plastic!) that I found in my basement.


Then I traced a metal star - temporarily stolen from my son's cowboy room - onto the bead board.

Then I hot glued penny's onto the star shape, overlapping some here and there to get the best coverage.
I attached my bead board to the back of my ikea frame (now spray painted white) and in less than 20 minutes was done with this one. Nothing's better than a 20 minute project, right?

I LOVE the copper against the white. It seems patriotic enough to me - after all, that's USA Currency, baby!
 
By the way - does this count as defacing money? Can I go to jail for this?

Related Posts with Thumbnails