Thursday, September 30, 2010

Indian Summer

Autumn is my favorite season.
I love the cooler temperatures, the changing leaves and the football. Usually I can't wait to pull out my Fall decorations and put them up.
This year, though, I'm reluctant to let go of Summer. Luckily, Mother Nature agrees with me. It's been close to 90 every day this week! We are definitely having an Indian Summer.

While I'm wasn't really feeling my fall decor yet, I felt like the Summer stuff was a bit out dated. So I came up with an Indian Summer theme. My Summer decor this year was yellow and turquoise. I decided to keep the yellow and replace the blue with red. Instant change.
You've seen the faux-sew pillows.

Sunflowers are EVERYWHERE right now, so I thought they'd work well on my porch, too. I used the super-fake looking artificial ones. Normally I hate silk flowers, but these are so fake they don't even look like they are trying, and that makes me like them more. (for today)
I also added a brown bottle (de-labeled and scrubbed) with 3 sunflowers stuck inside it.

The rest of the sunflower bush got hot-glued onto a foam wreath, which I then stuck in the middle of a fall wreath that I've ripped most of the good stuff out of. I like the way it looks, simple, but beefy :)

My favorite part is the "Indian Summer" sign that I made - because I wanted the theme to be abundantly clear. I used a scrap piece of beadboard and a scrap piece of hardboard.
Spray painted the beadboard red and covered the hardboard in yellow patterned scrapbook paper. Then I had lettered the words on using a sharpie. Hot glued the whole thing together, drilled a couple of holes and strung a ribbon through and the whole thing was done (even with paint drying!) in about an hour.


I like the porch. It's summery and autumny all at once.

Tomorrow is October 1, though, and I'm planning to put up the Halloween decorations then. When they come down, my Fall will go up. This Indian Summer look is fleeting, but it was a fun change to make.

Now...if the weather will just hold out a couple more weeks, maybe I can get one more outside project in.
Don't you think this window would look fab with shutters on it?
 

 Me, too!

Friday, September 17, 2010

Before and After!

The Creative Chick Parade has come to a close!
Today is day 5, our last day of linky love :)
Our theme today is Before and After!

You can post a link to any project you've done - as long as there are before and after pictures! I can't wait to see what you have to show off!


Wednesday, September 15, 2010

Recipe Round Up!

It's day 4 of the Creative Chick Parade!
I don't have a cute graphic today :(
I was stealing them from Diana at the Girl Creative and she didn't make one. I thought about making my own, but I decided against it.
So now you know I'm a thief AND I'm lazy.

Please don't let that effect your decision to link up!

I can't wait to see all your recipes! I love to cook/bake/eat, so these will be lots of fun for me to check out! And I'll be linking my own recipe up, too! It's for the worlds best sugar cookies - be sure to try them out!


Sugar Cookie Love

This is a repost from last year for the Recipe Round Up portion of the Creative Chick Parade!


I’m president of the SPO this year at my daughters school (it’s their PTA – just a different acronym.)
Anyway, we were in a meeting, planning the next several parent events we’ll be hosting and discussing food options. The general thought was that cookies were fine for afternoon activities, but for morning we should have something fruity/healthy and for evenings something savory.
MY opinion was slightly different. I will eat a cookie anytime.
Seriously – any.time. Wake me up from a dead sleep at 2am with a freshly baked cookie and I will thank you politely – then ask for more. I.love.cookies.
About a year ago I discovered a local bakery that makes the most amazing sugar cookies. Normally I’m not a sugar cookie fan. Give me peanut butter, oatmeal raisin, chocolate chip…throw as many extra ingredients in as you can. But sugar cookies? Boring!
These ones, however, are like heaven. Heaven with a touch of almond extract. Heaven with a texture that’s almost a cross between cookie-like and bread-like, with a thick layer of butter cream frosting that also has a touch of almond extract in it. If God eats cookies, (and I’m sure that he does!) then these are one of his favorites.
I spent a small fortune over a few weeks buying these cookies as rewards for myself. Rewards (?) you wonder? Yeah. It was like those Arctic Circle commercials – cookies were a reward for anything – cleaning the house, going to the gym, volunteering at school…
Unfortunately the cookies cost $1.75 each.
I’m not kidding. Ridiculous, right? But sooooo tasty…
So I began a mission to recreate the cookies. First I dreamed of things I could tell the head baker to make her give me the recipe, but abandoned that when I actually pictured myself making that phone call.
Instead, I made about 8 batches of sugar cookies, experimenting with different recipes until I finally got it right. I was hoping that by mastering them I would break their hold over me. Alas, that has not been the case. Still, at least now I can more than one without dipping into my savings account!
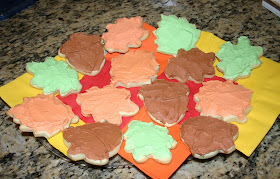
I made some last weekend and decorated them cute to take to a friends house. Look at that yumminess!


Now – when you make these (because you WILL make them, won’t you?) be sure to put a THICK layer of frosting on. Because the frosting is to die for.

Mandy’s Sugar Cookies
1 cup butter
3/4 cup sugar
2 eggs
1.5 tsp vanilla
1 tsp almond extract
2.5 cups flour
2 tsp baking powder
dash salt
Cream butter and sugar, add eggs and extracts, then dry ingredients. Refrigerate at least 2 hours, then roll out between wax paper with plenty of flour to about 1/3 inch thick. Cut into shapes. Bake at 350 for 10 minutes.  Cookies will NOT be colored on top when they are done, but will be light golden on bottom.
Cool completely, then frost.
Mandy’s Best Buttercream
1/4 cup butter
3 cups powdered sugar (appr.)
1 tsp almond extract
1 tsp vanilla extract
2 Tbsp hot water
Beat until fluffy – continue adding sugar and water until frosting reaches desired consistency.

Tuesday, September 14, 2010

Creative Chick Parade Day 3: Furniture Fix Up!

It's Wednesday! Day 3 of the Creative Chick Parade blog hop!
The day you get to share your Furniture Fix Up's!

Furniture projects are my favorites. I LOVE furniture. 
This is going to be the BEST linky day!!! 


I can't wait to see everyone's projects. Link up as many furniture projects as you'd like - I'm planning to look at them all! 


Once again, here's the list of bloggers that are part of this awesome blog hop! Check them out and share the love!


My Furniture Fix Up

This is a re-post in honor of the Creative Chick Parade.

I refinished this chair for my mom for Christmas last year. I thought it would be a useful one to repost, since I see chairs like this at the thrift store ALL the time.

Here's the before.


Love the lines! Everything else, not so much.
The caning in the back was pretty damaged - which was okay with me, because I don't really love caning, anyway.

I sanded her down and painted her heirloom white.


Then I cut her caning out.


She sat like this...backless...in the basement for a few weeks.  I couldn't quite figure out how I was going to put a new back in.  I began to wonder if I had screwed things up royally. Why didn't I just upholster the caning???
Oh, right...because it wasn't really structurally sound.

(But seriously? If your caning IS structurally sound, I would just upholster that. Because what comes next would be a very unnecessary step if you didn't absolutely need to do it.) 

Then I remembered my new crafting best friend, hardboard.
Hubby cut some out in the right shape for me.


I wrapped it in a double layer of quilt batting and the fabric I had chosen (staple gunned it all on) and screwed the hardboard into the chair frame. 


Then I took a piece of 1 inch foam and cut it to shape. I wrapped it in batting, too, then I used spray adhesive to attach the cushion to the hardboard.


I used the staple gun again to cover the cushion with fabric.


Then I covered the seams with a braided trim.


And here she is - totally revamped and gorgeous!


Monday, September 13, 2010

Sew What!

It's day two of the Creative Chick Parade!!!


Link up as many sewing projects as you want...we can't wait to see them all!!!

Once again - here's a list of all the super-cool bloggers that are part of this blog hop! Be sure to check them all out - many are hosting giveaways this week!


The Girl Creative


"sewing"

I know how to sew.
I'm not even bad at it.
But sometimes it's a lot of work.
Dragging the sewing machine out, threading the needle, winding the bobbin (it's always empty!)
Blah, blah, blah.

So when I wanted some sort of fall-themed pillows for my front porch, I decided to sew the easy way.
With my glue gun.
Bonus - I did the whole thing outside :)

I picked up some beautiful outdoor fabric at JoAnn's in the remnant bin. The big piece was about $4, the little piece was only about $2.  I used the pillows that I already had sitting out there and covered them up. I figure I'll just rip open the seams when I'm done with the Fall theme :)

Okay - here we go! Easiest sewing you'll ever do.
To start I folded the fabric with right sides together, then laid the pillow on top of the fabric and cut it to size.

Then I used my hot glue gun to glue two sides together so that only the bottom was open. Here it is after I turned it right side out.

Then I put the pillow in and glued the last edge together.


This is how my final "seam" looks.

Turned out cute, huh?

Honestly, I would never do this for pillows that were going to be inside the house - but for the porch? I love it - quick, easy and cute!

Mod Podge Mayhem!


Hello, readers!!!
This week I am participating in a blog hop with some amazing girls - I feel honored to be part of such a COOL group!!!
Each day this week I'll be hosting a link party for a specific type of project, starting today with Mod Podge - something I know you all love to use as much as I do!


I hope you're ready for a wonderful week of projects and giveaways! 

Add a link below to any project that you made with Mod Podge. Today is not the day to add your sewing projects or recipes (that will come soon enough this week) so be sure to only link up to your Mod Podge projects.

A bunch of the other wonderful co-hosts of the Creative Chick Parade are hosting some pretty cool giveaways this week so be sure to check them out:


There's NO limit to how many Mod Podge Projects you can link up! I can't wait to see them all!


My Mod Podge


In honor of the Mod Podge Mayhem linky party I'm helping to host this week, I thought I'd post one of my own mod-podge projects!
I use Mod Podge all the time, actually, it's just rarely to make anything that's cool enough to post about. I, for instance, have never covered a pair of SHOES with modge podge.  How freakin' cool is that???

Anyway - this is supposed to be about my project.
Which happens to be part of my kitchen redecorating project...which I've totally slacked off on posting about. I'm going to finish that up next week, I promise. So stay tuned for that.

Anyway - (again) - as part of my kitchen redecorating project I went on a beautifying rampage. My mantra was "everything must be pretty!"
And we all know...can openers (though necessary) are not pretty.

Rather than screw around with (and take the chance of destroying) a perfectly good can opener, I decided to disguise it.
I started by building a backless, bottomless box out of the cabinet centers that I had removed for my custom cabinet project.

I gave it a quick coat of cream paint so that the paper I chose would have a light background

Then I cut the paper and applied it with Mod Podge. A coat underneath to adhere the paper, and two thin coats on top to give it a somewhat waterproof finish.


I love the way it looks. It's so cute!

And it's super easy to slide to the side so I can use the can opener.

It's been sitting on my counter, right next to my sink, for 7 months and it's help up beautifully! I was a bit worried about steam or spray from the sink ruining the paper, but it's stayed perfect.