Wednesday, June 30, 2010

Darling, Inexpensive Party Favors

My friend Diana, over at The Girl Creative, is throwing a linky party today that's Birthday Parties. She's looking for special inspiration when it comes to Goody Bags.

I am a Birthday Party throwing psych case.
Sad, but true.
Every year I go insane planning my daughters Birthday party. Each year I manage to outdo myself in craziness.
Last year she had her first sleep over (which was actually a late-over for all but one guest.)
I made each girl a white, lace trimmed nightgown. At the party they got the decorate their gown with fabric markers and iron ones. Then they had a fashion show, set to music, which I made my husband videotape (so I could take still photographs.)
For the goodie bags I made them each a fabric bag with their initial quilted onto it. It was filled with sleepover paraphernalia.
These types of things - even when done by clever, craft mommy's - end up costing a lot of money. So my Tessa usually only gets to invite a few friends. Last year she invited 8 friends.

Narrowing it down is always the toughest part for my ridiculously outgoing girl. She counts EVERYONE as a friend.

This year I was super busy with end of the year PTA madness, and I didn't have the desire that I normally do to go completely overboard, so, instead, we threw the easiest Birthday Party known to man.
We rented a massive bounce house, reserved the pavilion at the park, and let Tessa invite everyone she knew to the party.
We ended up with 36 yes RSVP's.
And then I thought of the party favors.
I panicked, a bit, at first. I didn't want to spend my life savings on party favors! Plus, I absolutely HATE when my kids come home with party favors filled with way too much sugar or cheap, silly toys that break 2 seconds after they start playing with them.  I'm SO picky - it's hard NOT to spend a ton on favors!
But I took a deep breath and went to the Dollartree to see what I could find...

I purchased...
Three 12 packs of fold-up cardstock favor bags..........$3
Five 8 packs of snack sized Hershey Bars (Tessa's favorites)..........$5
Five 8 packs of party blowers..........$5
Nine 12 packs of sidewalk chalk..........$9
For a grand total of $22

Each cute little favor bag got a cardstock cutout on the front - half got a star, half got a flower. I attached them with super glue after I folded the bag up.
Then I put the candy bar, the party blower and 3 pieces of sidewalk chalk (tied together with curling ribbon) inside.  They turned out SO cute and cost just 0.65 each (including tax)!!!

I can't guarantee that I won't go insane next year and go overboard with the party favors again, but for this year, at least, my favors were super cheap!

Star Drinking Glasses

Another patriotic project for the month of July...


Starred Drinking Glasses!

(I didn't come up with this one on my own - I found it on Martha Stewart a few years ago. Here's her picture.)


You'll need a set of plain drinking glasses to start.  I spent less than $10 on a brand new set from Wal Mart that included 6 tall glasses and 6 short ones.

Draw a star on a sheet of paper. Mine was about 3.5 inches square.  Fit the paper inside the glass so you can see the star through the glass.
 

Using red, white and blue paint pens fill in the space of the star with small dots.

Let the paint dry for 24 hours, then bake the glasses in a 325 degree oven for 40 minutes.  This will set the paint so the glasses can be washed :)

Martha says they are dishwasher safe now, but I intend to wash mine by hand.


So cute! Wouldn't these be adorable at an Independence Day Barbecue?


Linking up...
A Little Craft Therapy
The Thrifty Home
Blue Cricket Design
Sugar and Spice
Make it Yours Day
Dragonfly Designs and
Creative Share

Tuesday, June 29, 2010

PB Knockoff, just in time for the 4th!


I'm so excited about this project!!!

Who among us had NOT seen this lovely from the Pottery Barn and coveted it for our own home?

It's gorgeous!
It's also $129
I don't spend $129 on accessories at my house. To be honest, I can't decide if I'm sad about that, or if I'm happy that I'm more creative than that.

Anyway, I decided to try my hand at another Pottery Barn knockoff.

I started by purchasing a sheet of wood from the Home Depot.

I used 1/4 inch thick plywood, because I wanted it to be light. I cut my piece to what I felt like was a large, but still manageable size.
The Pottery Barn flag is 27x50. 50 inches seemed incredibly long to me.
My flag is 24x36

I started by taping off my stripes. I counted them up on the PB flag - 7 red stripes, 6 white. I did mine just like theirs.

Red was first, white was second.
 

Blue was last.

After all the blue was dry, I used a rubber scrapbooking stamp to put the stars on.  I wasn't really super careful with these - I knew I was going to distress it, anyway.

Confession: there are only 40 stars on my flag. I apologize to the last 10 states in the Union. I just didn't have room on my flag. I don't think it's noticeable...

I forgot to take a picture of the flag when she was all shiney and new. I was too excited to beat her up, I guess!
The next step was distressing the flag with sandpaper. I started off with some 120 grit in my hand...but it really wasn't getting the job done quickly enough, so I switched to my power sander. It may have gotten a little over-distressed in a few areas, but overall I love how it turned out.

Since I used craft paint to paint my flag (I already had all the right colors, it was easier than buying real paint for the project! You could totally buy those sample paints from Home Depot for this, though, and then you could probably skip this step) I needed to seal it. So I used this Krylon Crystal Clear Acrylic Coating and gave it 2 good coats.

It darkened up all my colors and gave it a bit of a sheen. I realize it's kind of impossible to tell the difference in these photos...trust me, it gave it a much more "finished" look.
 

Next I attached D rings to the back for hanging it up. One on each side, about 2.5 inches in from the edge. Since my wood was kind of thin, I used some little washers to make sure my screws wouldn't poke through the other side :)
 

Then I (my husband) hung it from my gorgeous pergola. I'd have done it myself, but I could get the screw driver attachment out of my drill to put the right bit in. DH had tightened it up too much last time he used it. I swear he does it just so I will have to wait for him at times. It must make him feel strong ;)


LOVE.

Linking up all over the place...
The Girl Creative
Tools are For Women, Too
These Creative Juices
Today's Creative Blog
Sugar Bee

Friday, June 18, 2010

Father's Day Bulletin Board


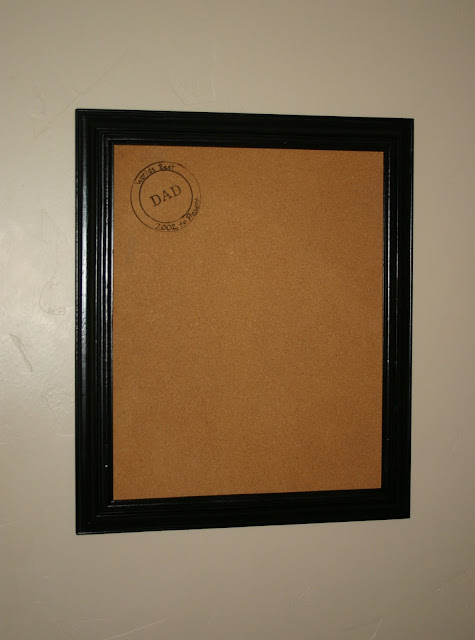
For Father's Day I wanted to make my husband a nice, pottery barn-style bulletin board for his office. A place he could keep pictures of the kids, cards they made for him, etc.
This was a super simple, CHEAP project that I think turned out exceptionally well!

I started with a chunky thrift store frame ($3) and an extra large thrift store bulletin board (also $3.)
 

The bulletin board was twice the size that I needed, so I cut it in half using a hack saw.
(the hacksaw was difficult to use, so when it came time to cut again I used the table saw - very carefully the first time because I wasn't sure if it would tear the cork to shreds! - it didn't, it worked perfectly)

Then I painted the frame with semi-gloss black paint. Gave it several very light coats.

Then I assembled the whole thing. I used my staple gun to attach the cork board to the frame.

And then I stood back and looked at it...feeling like something was missing...
Pottery Barns website yielded this for inspiration:

So I added this:

Traced both circles from a roll of packing tape - just slapped in down and traced around the outside, then the inside.  I wrote "Worlds Best" and "2002 to Present" with a marker. DAD in the center was stamped on with some letter stamps.

I love the way it turned out! Now I just need to pic up the couple prints I ordered to get him started :)


Monday, June 14, 2010

Sandbox


School is out. My run as PTA president is officially finished!!!
Spring soccer is over.
Girl Scouts is on hiatus.

I'm ready to start blogging again! It's time to regain some of those followers that I lost during my unofficial break.
I miss you, followers! I'm sorry I disappointed you...
(no worries. I might have un-followed me, too!)

Luckily, I HAVE been crafting while I was away! I always make time for that :)
So I have plenty to catch up on. I promise lots of posts this Summer!

Last year my husband and I built this swingset for our children.

At the time, I wanted to put a sandbox in the bottom portion of the tower, but the husband talked me out of it.  He had valid points...it's messy and cats may pee in it, namely.
But now I have a little boy who's almost 4.
There's a world of difference between 2.5 and almost 4. kwim?
The little boy LOVES dirt. LOVES it. He's digging in whatever he can find at this point. I'm already dealing with dirt. And as far as cat pee goes...I don't see very many kitties around here. We're really more of a dog neighborhood.
Mostly, though, I just WANT him to have a sandbox.

So I built one.

I started by cutting out the grass that was growing in the base.

Once all the grass was pulled up I measured the box and cut my lumber.  I used 2x6's and screwed them all together before fitting it into the existing box.

Then I screwed the two boxes together.

After the box was in place I used weed plastic and staples to make sure nothing will grow up through the sandbox.

Then we started filling it.

Our sandbox is pretty small. We used 7 50lb bags of sand in it - 350 pounds! That filled it pretty well, but there are 2 more bags in the garage to be added when we need them.

My last step was to cap off the tops of the boards with 1x4's, to give it a little more of a "finished" look, and to give the kids a spot to sit while they play.

It's a hit! The boy loves it - so does the neighbor girl :)


Linking up all over blogland!
The Girl Creative
Today's Creative Blog
Sugar Bee

Related Posts with Thumbnails