Showing posts with label home exterior. Show all posts

Thursday, October 7, 2010

Garage Door: Take 2

If you have the time/weather for one more outdoor project this year, let this be it.
Because it's fab.u.lous.

Okay - from the beginning...
Last Spring, I attempted to turn my metal garage door into something more decorative. I lusted after those super expensive wood doors, and had seen the standard metal doors painted to look like wood, and I decided I could do that, too. I didn't go at it blindly...I did some internet research...and the results were pretty impressive. At least, I was impressed. Here's the original Garage Door Makeover post.

Unfortunately, the finish did not hold up to the elements. Our home is on top of a mountain, and we have pretty severe Winters. Gusting winds...driving snow...you get it.
The garage door came away from the Spring thaw looking a little (lot) worse for the wear.
(not quite this bad - this picture was taken later in the summer...)

So I thought and thought about what to do to fix it.
Meanwhile, the garage door got worse and worse.


My darling husband begged me just to paint it black.
"But it's so boring!" (I wailed)
To which he replied "It's a garage door" (and he's thinking - how exciting does it need to be?)

But I'm nothing if not a rebel. And anyway, I figured my garage door is 50% of my home's curb appeal! It DOES need to be exciting!
So I did a little more internet research - I even looked into having the door faux painted by a professional. The cheapest price I could find for that, though, was $450.
Um...no.

Here we go.
First, I pressure washed the garage door. The old stain was still flaking off in places, though, so it had to be sanded. I won't lie - the husband did 90% of this part.

(sanded and ready to go!)

When that was done I painted it this disgusting caramel color. The neighbors were terrified, I'm sure.
Next I added some faux wood grain marks (using a wood graining tool) to random spots.


Finally I started painting it. I used three different colors - the gross caramel color I started with, a chocolate brown, and black. I mixed them on the brush, in buckets, and on the door, working towards a natural wood look - with lots of color variation.

When I was done, I applied 2 coats of spar urethane to seal it.

(in the sun)

 (in the shade)

This took a long time! I only worked on it while my little one was outside playing near me, though. If I had just worked on it straight through, I'd guess it would have taken about 3 days. One day for the base coat and first set of wood graining, one day for the painting part, and another day to seal it.

I love the way it turned out, and I've gotten a TON of compliments on it. Several of my neighbors have stopped to tell me how beautiful it is, and one even asked if she could pay me to do hers! I declined...for now. I'm pretty confident that this will hold up - the door was sanded first, I used all exterior paints, and I sealed it with an exterior urethane product. But still...if this one chips off, I don't want it happening on someone else's house!

Here's the original before. The garage door as the builder painted it. Blah!

Here it is after my original "faux wood" treatment

And here it is today - absolutely gorgeous :)

The new finish is a HUGE improvement over the old one - live and learn, right?!
Linking up all over town to show off my oh-so-labor-intensive project!
Transformation Thursday at the Shabby Chic Cottage
Get Your Craft On Thursday at Life as Lori
Show Off Your Stuff at Fireflies and Jellybeans
Strut Your Stuff at Somewhat Simple
and maybe some Friday parties, too. I'm really proud of this one! lol

Thursday, September 30, 2010

Indian Summer

Autumn is my favorite season.
I love the cooler temperatures, the changing leaves and the football. Usually I can't wait to pull out my Fall decorations and put them up.
This year, though, I'm reluctant to let go of Summer. Luckily, Mother Nature agrees with me. It's been close to 90 every day this week! We are definitely having an Indian Summer.

While I'm wasn't really feeling my fall decor yet, I felt like the Summer stuff was a bit out dated. So I came up with an Indian Summer theme. My Summer decor this year was yellow and turquoise. I decided to keep the yellow and replace the blue with red. Instant change.
You've seen the faux-sew pillows.

Sunflowers are EVERYWHERE right now, so I thought they'd work well on my porch, too. I used the super-fake looking artificial ones. Normally I hate silk flowers, but these are so fake they don't even look like they are trying, and that makes me like them more. (for today)
I also added a brown bottle (de-labeled and scrubbed) with 3 sunflowers stuck inside it.

The rest of the sunflower bush got hot-glued onto a foam wreath, which I then stuck in the middle of a fall wreath that I've ripped most of the good stuff out of. I like the way it looks, simple, but beefy :)

My favorite part is the "Indian Summer" sign that I made - because I wanted the theme to be abundantly clear. I used a scrap piece of beadboard and a scrap piece of hardboard.
Spray painted the beadboard red and covered the hardboard in yellow patterned scrapbook paper. Then I had lettered the words on using a sharpie. Hot glued the whole thing together, drilled a couple of holes and strung a ribbon through and the whole thing was done (even with paint drying!) in about an hour.


I like the porch. It's summery and autumny all at once.

Tomorrow is October 1, though, and I'm planning to put up the Halloween decorations then. When they come down, my Fall will go up. This Indian Summer look is fleeting, but it was a fun change to make.

Now...if the weather will just hold out a couple more weeks, maybe I can get one more outside project in.
Don't you think this window would look fab with shutters on it?
 

 Me, too!

Monday, March 1, 2010

Pretty, Simple Spring Wreath

I took down my Valentines wreath last week.
My door has been naked since then.

I never realized that I don't have anything for the front door for this time of year.
It's not really Spring yet - not here - but I am in full winter rebellion at this point. I needed something green and simple, so I started looking around.
Pottery Barn came to my rescue.

They sell this lovely moss covered wreath for $49.
It's currently on sale for just $39, but I still figured I could make it for less :)

The PB version is 18" in diameter. I bought the largest Styrofoam form the craft store had - it was only 16", but I figured that was close enough.

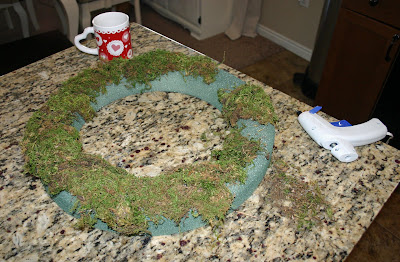
To start, I spray painted the form green.

Then I started hot gluing the moss on.  First to the front, then to the sides.


It was easiest to do the sides (both in and out) by standing the wreath on it's side.

When I had the form fully covered I took it out to the garage and sprayed it with spray adhesive, then I sprinkled some moss crumbs over it and patted it all around with my hands.
I hung it on my front door with a gold ribbon.


I love it. It's so sweet and simple and it was just a fraction of the PB price.
$5.00 for the wreath (used a 40% off coupon at Roberts)
$5.00 for the moss - I bought 2 packages at Wal Mart for $2.27 each, but I only used 1/2 of the second package, so the true cost was probably about $5, including tax.
The ribbon and hot glue were already in my stash.
$10 total - the perfect price to adorn my front door :)

Linking up!
Made it Monday at the Persimmon Perch
Met Monday at Between Naps on the Porch
Just Something I Whipped Up at The Girl Creative
DIY Day at ASPTL
Transformation Thursday at The Shabby Chic Cottage

Saturday, February 6, 2010

Happy Superbowl!

I've always loved football.
Although for a time, I guess it was more football players that I really loved.
Or maybe the football uniform. mmmm

Anyway, I've always loved football in some form.
My husband is from Denver and is a faithful Bronco's fan.  For the first few years of our marriage I was a tag-along Bronco's fan. But as I watched more and more games and learned something about the game, I actually began to form my own opinions about the players and the teams.
In 2006 The Saints hired Sean Payton as their head coach.
They also took Reggie Bush in the draft.  Oh...how I love Reggie.
Not only is he adorable, but he's a really great guy, too.  Check out his Wiki page and read about his charity.  Or don't - I guess he's my celebrity crush, not yours.
Anyway, The Saints also picked up Drew Brees from the Chargers in 2006.
By 2007 I was a Saints fan.

This year, they made it to the Superbowl.
(it's taking a lot of effort here for me to refrain from telling you why they are the best team in the NFL.)

I decided to make a sign for my front porch to show my support.

I kept my eyes peeled at the thrift store this week, looking for something that I could use as the base for my sign. I didn't want to spend the $8 that I usually pay at the wood store for a pretty board with routed egdes.
I found this.

I took the towel bar part off and puttied the holes.

Then I sanded it down and painted it with flat black spray paint.

When it was dry I used a fleur de lis stencil on one side.  Then I hand wrote "Go Saints!" with pencil, then went over it with gold paint. At the end I added another fleur with a foam stamp.
I lightly distressed the edges, drilled holes in the top two corners, and strung some wire through.

Then I hung it on the porch.

Now I'm almost ready for the Superbowl...
I just need to cook up some bacon-wrapped-cream-cheese-stuffed-jalepenos.
mmmmmm.

Go Saints!

Monday, October 5, 2009

Porch Bench

The same week I built the bench for my dining room table Kim, over at NewlyWoodwards, built one for her front porch.  Well, actually, her husband Ryan built it.  I loved the style and the idea so much that I told her right then I might have to steal it.  She clarified that I wanted to steal the BENCH – not her husband – and gave me permission.
Kim’s bench is SO sweet. It looks adorable with all her pretty fall decor arranged on it.


I wanted one bad, but I kept putting it off, thinking I’d have to build it from scratch like she did.
Then one day I remembered this mess that I bought at a yard sale a few weeks ago.


Seriously – is that not the ugliest thing you’ve ever seen? I only paid $3 for it, but I couldn’t figure out EVEN THEN why I was buying it. Take a good look, ladies, and remember this next time you whip out the craft paint because THIS is what can happen when you get carried away. Every bit of this thing – NOT just the stenciling – was painted with craft paint (which at least made it easy to sand off!)  Matt – who never says anything about all the junk I bring home – was horrified. I told him it would be fantastic when I was done with it. 
The gross little thing sat in my garage for a few weeks, sanded and primed (because I couldn’t stand to look at the grapes and ivy leaves for ONE MORE SECOND) while I thought and thought about what she might become. I rejected several ideas before remembering the porch bench.
One weekend I showed Matt Kim’s Bench Post and asked him if he thought we could use the mess as a starting point. I’d already purchased the MDF to use for the top.
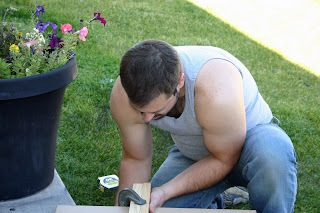
He got right on it – ripping apart the old bench and using it as the sides to the new one.


Then he cut the MDF for the top (to my specs, of course) built a box out of 2x4’s and attached it, evened out the bottom of the sides (so it wouldn’t wobble) and assembled the whole thing.


AND he looked cute while doing it!


Let’s zoom in on the part I like best…


ANYWAY…once he was done I primed it (grey) and painted it (black) and let her dry in the garage.


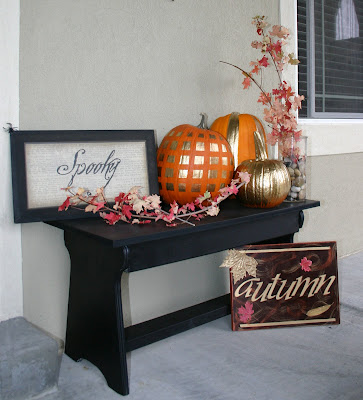
Then I moved her to her new home on the porch and gave her some decorations.


Pretty, huh?


If you love the “Autumn” sign (I’ll admit that I do – even though I’m the one that made it!) you can read all about making it here - it was super EASY and lots of FUN :)

Related Posts with Thumbnails