Showing posts with label PB knockoffs. Show all posts

Tuesday, June 29, 2010

PB Knockoff, just in time for the 4th!


I'm so excited about this project!!!

Who among us had NOT seen this lovely from the Pottery Barn and coveted it for our own home?

It's gorgeous!
It's also $129
I don't spend $129 on accessories at my house. To be honest, I can't decide if I'm sad about that, or if I'm happy that I'm more creative than that.

Anyway, I decided to try my hand at another Pottery Barn knockoff.

I started by purchasing a sheet of wood from the Home Depot.

I used 1/4 inch thick plywood, because I wanted it to be light. I cut my piece to what I felt like was a large, but still manageable size.
The Pottery Barn flag is 27x50. 50 inches seemed incredibly long to me.
My flag is 24x36

I started by taping off my stripes. I counted them up on the PB flag - 7 red stripes, 6 white. I did mine just like theirs.

Red was first, white was second.
 

Blue was last.

After all the blue was dry, I used a rubber scrapbooking stamp to put the stars on.  I wasn't really super careful with these - I knew I was going to distress it, anyway.

Confession: there are only 40 stars on my flag. I apologize to the last 10 states in the Union. I just didn't have room on my flag. I don't think it's noticeable...

I forgot to take a picture of the flag when she was all shiney and new. I was too excited to beat her up, I guess!
The next step was distressing the flag with sandpaper. I started off with some 120 grit in my hand...but it really wasn't getting the job done quickly enough, so I switched to my power sander. It may have gotten a little over-distressed in a few areas, but overall I love how it turned out.

Since I used craft paint to paint my flag (I already had all the right colors, it was easier than buying real paint for the project! You could totally buy those sample paints from Home Depot for this, though, and then you could probably skip this step) I needed to seal it. So I used this Krylon Crystal Clear Acrylic Coating and gave it 2 good coats.

It darkened up all my colors and gave it a bit of a sheen. I realize it's kind of impossible to tell the difference in these photos...trust me, it gave it a much more "finished" look.
 

Next I attached D rings to the back for hanging it up. One on each side, about 2.5 inches in from the edge. Since my wood was kind of thin, I used some little washers to make sure my screws wouldn't poke through the other side :)
 

Then I (my husband) hung it from my gorgeous pergola. I'd have done it myself, but I could get the screw driver attachment out of my drill to put the right bit in. DH had tightened it up too much last time he used it. I swear he does it just so I will have to wait for him at times. It must make him feel strong ;)


LOVE.

Linking up all over the place...
The Girl Creative
Tools are For Women, Too
These Creative Juices
Today's Creative Blog
Sugar Bee

Friday, June 18, 2010

Father's Day Bulletin Board


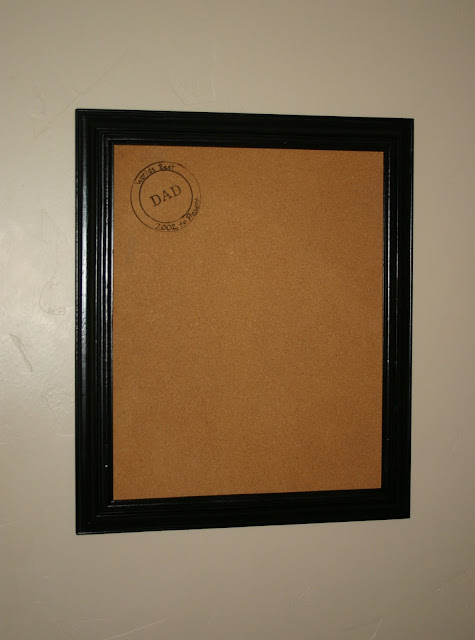
For Father's Day I wanted to make my husband a nice, pottery barn-style bulletin board for his office. A place he could keep pictures of the kids, cards they made for him, etc.
This was a super simple, CHEAP project that I think turned out exceptionally well!

I started with a chunky thrift store frame ($3) and an extra large thrift store bulletin board (also $3.)
 

The bulletin board was twice the size that I needed, so I cut it in half using a hack saw.
(the hacksaw was difficult to use, so when it came time to cut again I used the table saw - very carefully the first time because I wasn't sure if it would tear the cork to shreds! - it didn't, it worked perfectly)

Then I painted the frame with semi-gloss black paint. Gave it several very light coats.

Then I assembled the whole thing. I used my staple gun to attach the cork board to the frame.

And then I stood back and looked at it...feeling like something was missing...
Pottery Barns website yielded this for inspiration:

So I added this:

Traced both circles from a roll of packing tape - just slapped in down and traced around the outside, then the inside.  I wrote "Worlds Best" and "2002 to Present" with a marker. DAD in the center was stamped on with some letter stamps.

I love the way it turned out! Now I just need to pic up the couple prints I ordered to get him started :)


Tuesday, April 6, 2010

PB Side Table Knock Off

After :)


I had this table in my family room that was hideously ugly.
So ugly, in fact, I don't have a before picture of it.
But I did find this one. It was the background of a picture that's about 3 years old.  Many, many things in my house have changed since then - but it at least gives you an idea of where I started.

This is a side table that Pottery Barn sells for $200

I love it, but (as usual) their price is a little rich for my blood.
So I watched my local online classifieds and I kept an eye out at the thrift store, and eventually I found a pair of round tables that I thought would work nicely. I offered $35 for the 2 of them.
Then my boy and I took a little road trip and drove for over an hour to pick them up.  We met our sellers in the parking lot of a grocery store near their home. While we were there we went inside to go potty and buy some snacks for the ride home. I ate my first twinkie in over a decade. It was my boys first twinkie EVER. It's a day we'll always remember. Maybe.

Anyway, I got my little tables and I brought them home, and then I started sanding.

I decided only to work on one, for now. I'm sure I have a perfect place for table #2, so I'm going to hold off on the makeover until I find it :)

When I had sanded it sufficiently (and removed that strange little brass thing)

I gave it several light coats of Heirloom White.
One that was all dry I brought the table inside (since it's COLD here!) Then I gave it a light sanding to smooth the finish out. Notice the dust on the floor.

Then I gave it a couple more coats of paint - a Behr color that matches Heirloom White exactly.


I think it turned out beautifully! And the total cost was no more than $20 - just a tenth of PBs table :)


Linking up to all my favorite blog parties for the first time in WEEKS!

P.S. I promise to put up a kitchen post this week - I know I've been a major slacker lately!

Thursday, January 7, 2010

Wooden Box

I can't remember if I've mentioned this before...
When my Pottery Barn catalog comes it's like an event.  I secret it away until I have an hour to look through it. Then I sit down, armed with a pen and a pad of post-it notes, to pour through it. I usually come away with about 1/2 the pages folded down, items circles and notes written (on the post-it's) on those pages.
To be honest, this is actually a bit embarassing.
People think I'm creative. They have no idea that I'm just a big PB copy cat.  Am I the only one in the state receiving their catalog?

Anyway - this was the picture on one of the pages I marked in the fall catalog.


This is what I saw.


I circled it and wrote a post-it note that said "Love these boxes for beer - Christmas for guys?"

I forgot about them until about a week and a half before Christmas, when I was stressing about what to get for my BIL.  That night, I dreamed about the box.
I kid you not.
In the morning I woke up with the picture in my head. I tore through my winter catalog first, then found it in the fall catalog. I had to see the picture...to verify that this wasn't something I had actually thought up on my own.

Then I got to work building the box.
I made 2 before Christmas.  We filled them both with an assortment of expensive beer. One was for my BIL, the other we took to a friend gift exchange, where (I'm proud to say) it was very popular and was actually fought over.  I know that was probably due to the beer, not my box, but it still made me happy.

I really wanted one for my own coffee table, though, and Whitney and Ashley's "I made it without my hubby" party at Shanty2Chic was the perfect excuse.
I built this box last night, finished it this morning.  Just so I could post about it :)

Here's the how-to...

Materials -
a 1x4 (I bought the shortest length and had some left over)
Plywood (for the first two I used leftover pieces, for this one I bought some luan plywood.)
You'll also need a hammer and nails. Optional items include a distressing tool, stain and glue.

For the first box I laid out my beers and measured around them.
Now I know exactly what to cut the wood to, so I'll share :)
Cut the 1x4 into 3 pieces at 10 3/4 inches and 2 pieces at 8 1/2 inches.
Your plywood should be cut to 12 1/4 x 8 1/2.


You're going to cut a few more small pieces later, but those will have to be measured individually.

I wanted the boxes to have a kind of beat-up, aged appearance, so I distressed them with my hammer and this tool...which I use for all distressing. I don't have any idea what it actually is, though. My husband dug it out of the toolbox in the back of his truck months ago when I told him what I needed. I commandeered it :)


Then I mixed wood stain and paint into my paint glaze until it was an old grey-brown looking color. Wiped on, wiped off (making sure to get extra into all my distressed areas!) and my wood was instantly aged!


I used Quick Grip (my favorite glue) to put the outside of the box together and gave it about an hour to set. Then I attached the bottom with glue, too.


Once it's all dry you can put the center piece in. Make sure to measure so you get it nice and centered.  I glue this in (to the bottom) as well.


For the small divider pieces measure individually. Mine measured between 2 7/8 and 3 3/8.
Those pieces get the glaze treatment, too.
 

Once everything is thoroughly dry I nailed it all together.  First the outside box - 2 at each corner, 1 at each end where the centerpiece attaches, and one on each of the 4 bottom corners.
The little divider pieces go in now - measure to make sure your squares are equal - and nail them in from the sides.


Originally I thought I'd use two longer pieces of 1x4 (notched) to cross the center piece, but that seemed really difficult and is definitely NOT something I could do without my hubby.
That's sort of imperative around here - partially because he works a lot, but mostly because I don't wait well.

Anyway - here's the finished project!


I love it :)
Here it is on my coffee table


and...


I'll be linking up to the "I made it without my hubby" party at Shanty2Chic! Go see what some more independent women have done!
Also linking up to Transformation Thursday at the Shabby Chic Cottage!


Related Posts with Thumbnails