Showing posts with label furniture refinishing. Show all posts

Monday, June 20, 2011

Painting Laminate

I feel like I should be back with something fabulous after being away for so long.
However, it's 8:39 on a Friday morning. I've got about 20 minutes until my brother in law shows up to drop off my nephew and my own kids are awakened by my two dogs barking their heads off at the knock on the door. So instead of fabulous, you get fast and easy :)
Fabulous will come later.

Every DIY/Crafter wonders about painting laminate, right? It's the one thing that no one wants to say "sure! we can do that!"
That's because there are so many different TYPES of laminate. Some are a lot cheaper than others. Some chip off the particle board underneath them.
Some of them, however, are perfectly suitable for painting. It's just a matter of finding a piece that will work. Look for one without chipping or peeling. You shouldn't be able to get your fingernail into the laminate seams. And it should just FEEL thicker. Less glossy.
It's hard to explain, but if you look at enough laminate furniture, you'll be able to tell the decent stuff from the crap.

I found this 3' tall, 2' wide bookshelf at my local DI for $5. For that price, I thought I'd try it. I was my daughters room mom this year, and I really liked her teacher. I wanted to give her something special for Teacher Appreciation Week, and a bookshelf for her classroom seemed like a fun, appropriate gift.

First step was sanding. I used 80 grit to go over it once - fairly lightly - then 100 grit to go over it a second time.

Then I gave it a coat of spray primer.

I painted it a pale aqua - a beautiful color I had mixed at the Home Depot in one of the Glidden paint samples for less than $3. I like using Glidden because their tiny pots come in both flat and eggshell, instead of just flat (like Behr.)

Once it had a couple coats of gorgeous on it, I decided it still needed...something. I considered distressing, but decided to go with a stencil on the sides, instead.

They totally played up the "grandma" feel of the piece - which I loved <3


My daughters teacher loved it, too.
On the last day of school I helped her move some furniture around the room - it all had to be stacked in one area so the rest of the class could be cleaned. The paint had held up perfectly - despite a class of 25 third graders using it daily.
So...painting laminate is definitely possible - as long as it's good laminate, and you do it right :)


NOTE: 8:39 on Friday morning actually turned into 9:15 on Monday morning, because on Friday the kids woke up at about 8:42 and my brother in law showed up at about 8:45 and then, before I knew it, it was Friday night at 9:30 when I was finally done doing kid stuff. Whew! Blogging is tough when you're a mom!


Tuesday, September 14, 2010

Creative Chick Parade Day 3: Furniture Fix Up!

It's Wednesday! Day 3 of the Creative Chick Parade blog hop!
The day you get to share your Furniture Fix Up's!

Furniture projects are my favorites. I LOVE furniture. 
This is going to be the BEST linky day!!! 


I can't wait to see everyone's projects. Link up as many furniture projects as you'd like - I'm planning to look at them all! 


Once again, here's the list of bloggers that are part of this awesome blog hop! Check them out and share the love!


My Furniture Fix Up

This is a re-post in honor of the Creative Chick Parade.

I refinished this chair for my mom for Christmas last year. I thought it would be a useful one to repost, since I see chairs like this at the thrift store ALL the time.

Here's the before.


Love the lines! Everything else, not so much.
The caning in the back was pretty damaged - which was okay with me, because I don't really love caning, anyway.

I sanded her down and painted her heirloom white.


Then I cut her caning out.


She sat like this...backless...in the basement for a few weeks.  I couldn't quite figure out how I was going to put a new back in.  I began to wonder if I had screwed things up royally. Why didn't I just upholster the caning???
Oh, right...because it wasn't really structurally sound.

(But seriously? If your caning IS structurally sound, I would just upholster that. Because what comes next would be a very unnecessary step if you didn't absolutely need to do it.) 

Then I remembered my new crafting best friend, hardboard.
Hubby cut some out in the right shape for me.


I wrapped it in a double layer of quilt batting and the fabric I had chosen (staple gunned it all on) and screwed the hardboard into the chair frame. 


Then I took a piece of 1 inch foam and cut it to shape. I wrapped it in batting, too, then I used spray adhesive to attach the cushion to the hardboard.


I used the staple gun again to cover the cushion with fabric.


Then I covered the seams with a braided trim.


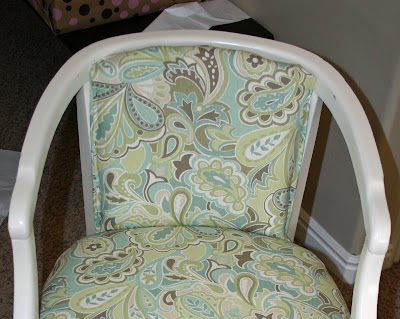
And here she is - totally revamped and gorgeous!


Tuesday, April 6, 2010

PB Side Table Knock Off

After :)


I had this table in my family room that was hideously ugly.
So ugly, in fact, I don't have a before picture of it.
But I did find this one. It was the background of a picture that's about 3 years old.  Many, many things in my house have changed since then - but it at least gives you an idea of where I started.

This is a side table that Pottery Barn sells for $200

I love it, but (as usual) their price is a little rich for my blood.
So I watched my local online classifieds and I kept an eye out at the thrift store, and eventually I found a pair of round tables that I thought would work nicely. I offered $35 for the 2 of them.
Then my boy and I took a little road trip and drove for over an hour to pick them up.  We met our sellers in the parking lot of a grocery store near their home. While we were there we went inside to go potty and buy some snacks for the ride home. I ate my first twinkie in over a decade. It was my boys first twinkie EVER. It's a day we'll always remember. Maybe.

Anyway, I got my little tables and I brought them home, and then I started sanding.

I decided only to work on one, for now. I'm sure I have a perfect place for table #2, so I'm going to hold off on the makeover until I find it :)

When I had sanded it sufficiently (and removed that strange little brass thing)

I gave it several light coats of Heirloom White.
One that was all dry I brought the table inside (since it's COLD here!) Then I gave it a light sanding to smooth the finish out. Notice the dust on the floor.

Then I gave it a couple more coats of paint - a Behr color that matches Heirloom White exactly.


I think it turned out beautifully! And the total cost was no more than $20 - just a tenth of PBs table :)


Linking up to all my favorite blog parties for the first time in WEEKS!

P.S. I promise to put up a kitchen post this week - I know I've been a major slacker lately!

Tuesday, December 22, 2009

Doll Clothes Armior

This is Kit.


She's a $100 doll from American Girls.  She's recommended for ages 8 and up.

This is Tessa.


She's my very destructive 7 year old who loves the American Girl books and who is cute, sweet and charming enough to get whatever she wants - despite my better judgement.

Tessa's getting Kit for Christmas.
The doll and her accessories make up the vast majority of her gifts.
I've spent much of the 3 months praying that Tessa will take good care of her doll, as she has sworn to do (should she ever receive one.) Praying that she'll not take her scissors or her markers or God knows what else to her very expensive dolly.  Because if she does, I cannot be responsible for what I might do to her.

I've also spent a good portion of the last 3 months working on a sort of armior for Kit's clothes and shoes - hoping that having a pretty place to put things will inspire my girl to keep things neat. Though it never has before.
I feel like this project took forever - first in the conception, then in the execution, and finally in taking a decent photo of the thing to post here. Ironically, creating the thing took FAR less time than the other two steps did

ANYWAY.
I looked and looked at the thrift stores for a cabinet that would work.  I had measurements, of course, and an idea of how I wanted it to work, but no real inspiration, other than the idea in my head.
I finally ended up with this piece - an old bathroom wall cabinet, solid wood and very heavy.


I removed the doors, sanded her lightly and painted her white, using Rustoleum Primer and Paint, of course.
I flipped her upside down and added a dowel to use as a clothes hanger.


Then I cut a piece of MDF to the width and length I wanted it, and had hubby give the ends a 45 degree angle so I could but them up against each other.  They got a coat of white paint, too.


I painted the doors and the front of the cabinet with butterflies, flowers, polkadots and squiggly lines...
trying to make it whimsical and little-girly...


To be honest, I'm not sure I love how it turned out.  I have very little artistic talent, and though I wanted it to be some gorgeous custom painted creation (a'la Miss Mustard Seed) it's just...not.

At this point I gathered all my pieces together...


And assembled it.


But it still looked a little...flat.
So I decided feet would help.
I picked up some unfinished wood pieces from the craft store. I think they are supposed to be for candlesticks to sit in?
I painted them white.


Then screwed them onto the bottom of the cabinet.


I plan to attach this to the wall in her bedroom - low enough that she can access it, of course - possibly resting on the floor. We'll have to see how it looks best. I just don't want it tipping over constantly.


The space in the top fits the doll perfectly.  It's like a little bed. So, if my darling daughter wants me to, I will make a little pillow to pit in the space and Kit can sleep there.


(the doll in the picture is a Target brand American Girl knock-off that Tessa has had for a few years.  It's the same size as the real deal.)

So - here it is!


I'm fairly happy with it as a storage piece, though I think my decorative painting could be improved upon. I'm just not sure how to do that. Doesn't matter anyway - this is how it will be on Christmas morning!  I am DONE for now!


(P.S. I forgot to paint the inside of the doors! By the time I realized it there was no way I was removing them to paint again, so I covered the insert in contact paper and left the outside the original oak.)

Linking up to DIY Day at ASPTL!

Wednesday, December 9, 2009

Arm Chair Refinish

I always try to make a lot of the gifts I give at Christmas. This year I've been inspired (mostly through the blog world!) to take it even further. I've attempted some pretty large projects for people that I normally just buy gifts for. I'll admit, I'm very excited to give these gifts!
I shared the dresser I refinished for my mother-in-law a few weeks ago.
Today I'm sharing the chair that I refinished for my mom.
Here's the before.


Love the lines! Everything else, not so much.
The caning in the back was pretty damaged - which was okay with me, because I don't really love caning, anyway.

I sanded her down and painted her heirloom white.


Then I cut her caning out.


She sat like this...backless...in the basement for a few weeks.  I couldn't quite figure out how I was going to put a new back in.  I began to wonder if I had screwed things up royally. Why didn't I just upholster the caning???
Oh, right...because it wasn't really structurally sound.

Then I remembered my new crafting best friend, hardboard.
Hubby cut some out in the right shape for me.
 

I wrapped it in a double layer of quilt batting and the fabric I had chosen (staple gunned it all on) and screwed the hardboard into the chair frame.


Then I took a piece of 1 inch foam and cut it to shape. I wrapped it in batting, too, then I used spray adhesive to attach the cushion to the hardboard.


I used the staple gun again to cover the cushion with fabric.


Then I covered the seams with a braided trim.
 

And here she is - totally revamped and gorgeous!


Linking up at Donna's!


Related Posts with Thumbnails