Showing posts with label hairbows. Show all posts

Wednesday, October 6, 2010

Bow Tutorial

A few weeks ago I posted a Bow Holder project I had made for all my daughters hair bows. I mentioned then that I would post a Hair Bow Tutorial at some point in the future...
So here it is!

There are a lot of ways to make hairbows - mine probably isn't the best/most professional/easiest way. It's just the way I do it - and it works for me! My daughter is VERY (over)active, and these stay together for her - so I must be doing something right!
Type A: The Boutique Bow

To start I cut two lengths of ribbon based on what size I want my bow to be. I singe the ends with a lighter and fold them into loops. I use hot glue to attach mine - a very tiny bit! Otherwise you won't be able to gather the bow in the center.

(I used to use sewing glue, but found that hot glue holds about a millions times better and dries about a million times quicker)

Put one loop inside the other and turn them so they make an X

Then cut your additional ribbons. For this bow I used 1 wide organza ribbon and 4 coordinating gross grain ribbons (2 of each pattern.)

Again, I singe the edges with a lighter, then layer the ribbons on top of my X.

I use super thin floral wire to wrap the middle as tight as I can get it.


At this point I added another ribbon - it felt like it needed some more pink.

Then I choose a coordinating ribbon to use as the center wrap and attach it with a dot of hot glue.

I attach the barrette to the back of the bow with (yep!) more hot glue - then wrap the ribbon over it.

And there it is!

Type 2: The Pony Bow

I just learned how to make this style, and I love it. I actually purchased one from Gymboree so I could examine it closely. Mine are just as fabulous as theirs are, and are SO MUCH CHEAPER.

Start with several pieces (I used 10) of coordinating ribbon in different widths and patterns cut to about 14 inches long.

Make sure they're nice and flat - I use a 1/2 inch flat iron to smooth mine out.

You're going to choose two "main" ribbons to become your T for the bow. One will be the bottom, the other will be the top. They should match each other.
Start with the bottom ribbon and begin crossing ribbons over the top of it.


The goal is that no two ribbons sit directly on top of each other - so you can see them all when it's laying flat - but you want to keep them pretty close together or the ribbons don't fall as pretty when it's in the pony tail.

Once they're all laid out how you want them, sew them together. You don't have to use a machine for this, but I did.


Sew it in an X, so you're sure to get all the ribbons.

Then you take your elastic, stand it up right and use your second "T" ribbon to attach it.

I marked where I wanted it and sewed the first side without the elastic in it.

Then I slid the elastic back in and sewed the second side down.

And that's it.


Here it is in my daughters pony tail. I love this style of bow! It's so sweet - but a little more "grown-up" looking :)

Monday, August 30, 2010

Back to School Bows


Sorry for the long absence!
My daughter went back to school last week, and I was busy preparing for that...
Then I was trying to figure out how to pace my day around drop-off and pick-up...it's always so hard to change your schedule, isn't it?

Every year before school begins I spend a day or two making hair bows.
And every year, but the time Summer rolls around, she's lost them all.
She loves to look pretty, but she loves to PLAY even more, and when she's running and rolling and hiding and seeking on the playground at recess she tends to lose bows. Since I'd rather she play than worry about her hair, I try not to get too irritated by it. And since I sort of like making bows, I keep replacing them.

This year I went overboard. My ribbon collection needed to be cleaned out anyway, and I just kept making them. She ended up with WAY too many to fit in her current bow holder (a rubbermaid 3 drawer storage cube.)

So I decided to make something cute to hold them all, instead :)

I started with a chunky wooden frame (16x20) and a craft kit I found on clearance at JoAnn's.
I forgot to take "before" pictures, so picture the frame an ugly wood tone and the butterfly pieces unpainted.

Once they were painted I attached the butterfly pieces to the frame - making it the center of the bug.

I purchased some rabbit wire at a local farmer supply store. Cut it to size with my wire cutter and attached it to the frame with hot glue.

A note about the rabbit wire - originally I wanted chicken wire (with the people at the farm supply store called Poultry Wire) but it was sold only in large rolls. The rabbit wire was sold by the foot, however, and they had two different sizes on sale for just 0.99 a foot. I bought 3 feet so I'd have some left over in case I decide to make another :)

Here's the result - before she was filled up with bows. I hung it on the wall in my daughters bedroom.

The majority of the bows I've made have the barrette style hair clip on them, as they stay in her hair about a million times better. A few have the alligator, pinch open/close style clip on them. Both stay on the holder very well! The alligator kind just pinches on, and the barrette style just kind of sits on the wire. It stays on perfectly.

I'm sure you noticed the excess of navy blue...my daughter wears a uniform to school, so almost all of her bows have navy and/or white in them to match :)

I really like the way it turned out - it's sweet and girly and functional, too!


Wednesday, May 6, 2009

Practice Cake

Matt is working late.

Project #1 for the evening is a practice cake for Tessa's Birthday.
I'm a big fan of the practice cake.  It allows me to try out the recipe, the pan, the tools.  
It also allows me to eat cake.

Tonight I made a from scratch vanilla cake, which I added a few drops of almond extract to - because I have a serious almond extract addiction lately.
I baked it in my springform pan.  I was nervous about it leaking...but all went well!
I picked up a cake leveler today from JoAnn's.  

Interesting product, a cake leveler.
Or maybe it's not that interesting.  Maybe I just suck at using it.

Anyway, long story short, the cake tasted good but didn't look it.  Don't know how much use that leveler will be getting.  At least I know the pan works and the recipe is tasty!


Project #2 for the evening...
Hairbows!

Tessa's pen pal, Karissa, turned 7 on april 26th.  We've had a letter to mail her for a while, but I decided to hang on to it and send a Birthday package.  Just got around to making her gift tonight.
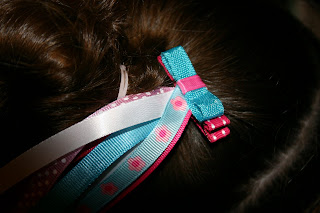
If i remember right, her favorite color is blue.  So I made these cute blue and pink hair clips for her.

Tried them on Tessa, to make sure they worked :)

Project #3 - Mothers Day Cards!
One for each mom - luckily there are no divorces in either family, so I only had to make 2 ;)

I looked up quotes about mom to find something to write in them.  I'm not a Hallmark employee, and even if I were I think I'd have a hard time writing something like
"for all the times you were there for me...
here's a card."
The quote I decided on cracked me up - hope the mom's find it as entertaining!

"Mothers are fonder than fathers of their children becuase they are more certain they are their own" - Aristotle
Related Posts with Thumbnails