Showing posts with label holidays. Show all posts

Friday, October 8, 2010

Halloweenie

Sometimes my creativity runs out.
In particular, I have trouble coming up with anything original for Halloween.
So instead, I stalked some blogs and copied some things.
Hooray for plagiarism!
Even if it does make me feel like a (hallo)weenie. LOL

First - this adorable "Trick or Treat Frame" from Crafts & Sutch
I made my own - and I love it :)


Next - I loved these cute "Scrap Spookies" from Diary of a Preppy Mom
So I copied them, too.

The Pumpkin (mine had a wood stem and glitter in the paint)


The Mummy (mine is wrapped in white burlap instead of muslin, and I used buttons for eyes)

The Frankenstein (no fabric on mine, and he has button eyes like the Mummy)

I did manage to come up with one additional scrap spookie...
A Bat! (his wings are cut from leftover hardboard)


The one original Halloween decoration I made this year was a wreath for my front door.
I died black tulle (and a tiny spot of purple, for interest) around a metal wreath. In the middle I attached a metal spiderweb I've had for years. Then I added some scary spiders. I love it!

Happy Halloween, everyone! And thanks to Erin @ Craft & Sutch and to Preppy Mom for making such cute projects! I had a blast copying them :)

Friday, July 2, 2010

My Last Patriotic Project


Okay - this will be my last patriotic project for this year!
After all - the 4th of July is only 2 days away!

In Utah we celebrate the 24th of July, too. It's Pioneer Day - and we celebrate it in much the same way as we do the 4th. Barbecues and Fireworks and lots of red, white and blue. That makes it possible to stretch my Patriotic Decor all the way through August 1 :)

I needed something patriotic, but in a non-traditional (meaning not red, white and blue!) for my entry table.  Here's what I came up with.

I started with a scrap piece of bead board and am ikea frame (still in the plastic!) that I found in my basement.


Then I traced a metal star - temporarily stolen from my son's cowboy room - onto the bead board.

Then I hot glued penny's onto the star shape, overlapping some here and there to get the best coverage.
I attached my bead board to the back of my ikea frame (now spray painted white) and in less than 20 minutes was done with this one. Nothing's better than a 20 minute project, right?

I LOVE the copper against the white. It seems patriotic enough to me - after all, that's USA Currency, baby!
 
By the way - does this count as defacing money? Can I go to jail for this?

Wednesday, June 30, 2010

Star Drinking Glasses

Another patriotic project for the month of July...


Starred Drinking Glasses!

(I didn't come up with this one on my own - I found it on Martha Stewart a few years ago. Here's her picture.)


You'll need a set of plain drinking glasses to start.  I spent less than $10 on a brand new set from Wal Mart that included 6 tall glasses and 6 short ones.

Draw a star on a sheet of paper. Mine was about 3.5 inches square.  Fit the paper inside the glass so you can see the star through the glass.
 

Using red, white and blue paint pens fill in the space of the star with small dots.

Let the paint dry for 24 hours, then bake the glasses in a 325 degree oven for 40 minutes.  This will set the paint so the glasses can be washed :)

Martha says they are dishwasher safe now, but I intend to wash mine by hand.


So cute! Wouldn't these be adorable at an Independence Day Barbecue?


Linking up...
A Little Craft Therapy
The Thrifty Home
Blue Cricket Design
Sugar and Spice
Make it Yours Day
Dragonfly Designs and
Creative Share

Thursday, March 18, 2010

Decorating for Spring

I'm itching for Spring.
The weather is actually cooperating this week and we've had THREE 50+ degree days!
Unfortunately it will still be several weeks before the mound of snow in my yard melts off.
Still - it's definitely time to decorate for Spring.

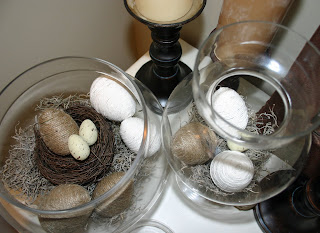
Here's how I started - by jumping on to the bird and egg bandwagon, of course!
(I've wrapped so many plastic easter eggs in twine over the past week that I could do it in my sleep!)

This dresser by my front door is my favorite decorating surface in my whole house. It's a perfect display area and I love to pile lots of seasonal decor on it.

My "Spring" vignette was a little lacking, though.  I wanted it to be tonal and soothing...but it ended up flat and boring.

I decided it need (what else!) a wreath.

So made the easiest wreath ever by trying some ribbon and a scrapbooking tag (which I wrote "nest" on) to a small grapevine wreath. I added a tiny nest and a couple of faux robbins eggs and called it good.


I covered a small styrafoam ball with moss and threw it on the dresser top to add a little green.


SO much better!

The display is almost entirely the same, but a couple new elements really helped everything pop.


Thursday, January 21, 2010

Valentine Buttons


My daughter goes to a charter school where she wears a uniform.
I LOVE it.
Most of the time.

It's kind of a bummer around the holidays, though. She always has a cute Halloween t-shirt or Christmas dress that would be fun for her to wear to school.
We make due with accessories, instead.
Hairbows, bracelets, necklaces, earings...

Two years ago, when she was in Kindergarten, I made these sweet felt heart button covers.
They were looking a little worn, so I decided to make new ones this year.
We love them - I'll bet if you have a little one that wears a uniform, I'll bet she would love them, too!
They take about 90 seconds to make, here's how!

First, use the stiff felt at the fabric store.
When I made these I used plain red for 2 and pink with glitter for 3.


Figure out how big you want your hearts to be - just measure your space between buttons and decide what size you want.  Mine ended up about 1.75 inches from top to bottom.


Cut out your hearts.


Fold them in half (top to bottom) and cut a small slit for the button hole.
 

Slip them over the buttons and send your darling girl to school. She'll be the cutest one there!


Here's my cutie last year at her Valentines party. I was her room mother, we played a beanbag toss for one of the games. Isn't she adorable?


Friday, December 18, 2009

My Christmas House

I might be the very last blogger to post pictures of my Christmas decor...
Still, I thought I'd share. After all, if there's not blog evidence of it, who's to say it even happened? lol

It seems like half of my Christmas decor is very down-home country feeling - pine cones, burlap, wood...
the other half is super glittery, glam and/or metallic.
They never seemed to belong together.
In the past I've always tried to group the like items together - attempting to create cohesive areas, even if the majority of the house didn't "go" together.

This year, I decided my theme would be sort of a country mouse-meets-city mouse thing.  Rustic and elegant, all in the same vignettes.
Not to pat my self on the back, but I totally love the outcome.

Here's my front door.


I went wreath-crazy this Christmas, making a total of 5 from the remnants of old wreaths (and a few new things.) This one is my favorite, I think. I love the tiny gold birdie and the monogram.
I hung it from a strip of burlap straps I tied together.


Above the door I have one of those grapevine arches. Every year I tuck some evergreen branches into it (from the bottom of our Christmas tree) and some fake berries.  Super festive, super easy!
Notice the kissing ball hanging from the arch...I love me some mistletoe!


On the bench we built this summer I put a basket filled with candles and more evergreens. LOVE this <3


This is the entry way.  To the left is this table,


To the right is this dresser.


The wreath was #2 of my wreath projects


My apothecary jars are new, and I love them! One is filled with pine cones and a (fake) sprig of greenery. The other is filled with some glittery ornaments I bought from the Pottery Barn a few years ago. Both are nestled on fake snow :)


I've had the "Believe" sign for a couple of years - I re-glittered it this year, then sprinkled some of the glitter on the table top about it. It feels magical to me :)


And this is one of my chalkboards :)


The front room is where our tree is.


I mentioned this in the post about my banner, but this room is filled with books. It's sort of our "library."
The tree has a NOEL banner on it, made from vintage book pages.


And here are the gingerbread boy and girl ornaments I made earlier this year!


The book shelves have some decor on top, too.


I had to move the bench I normally have in front of the window so the tree would fit there. I put it on this wall.


Above it I put this wreath (#3.)  It was lonely looking, so I spray painted this dollar store bird and added her (and some metallic berries!)


The wall vinyl came from JoAnn's.


The card holder I whipped up with extra fabric, buttons and paperclips.  Cute, huh?


The Dining Room area is my favorite in the whole house, and where I think my "rustic elegance" came together best.


Burlap Placemats with a glittery silver monogram.
Delicate wineglasses and silver snowflake napkin rings...


The centerpiece is a rosemary bush shaped into a Christmas tree that I wrapped in dark brown burlap. I added a couple of burlap flowers, too.  It sits on a silver charger.  Later I ripped some large metallic "berries" from their stems and sprinkled them around it.


I hung snowflakes from the fan and from the curtain rod on the window behind.  They are covered in glitter...along with everything else in the area!


The buffet has my candlestick collection, of course!
I wanted something practical there, as well, and since we tend to have lots of people over this time of year, I chose my regular, everyday dishes on a short silver pedestal.
I've had the gold Christmas tree candle forever, but I've never had a place I thought it looked right...love it here!


In the family room we have a mini tree.  My kids decorated this one all by themselves, and every morning my 3 year old rushes to plug it in.  I put this display together thinking "what does it matter if one area's not perfect?" but it turned out that I totally love it!


Above the sliding glass doors I hung a berry wreath (#4) and a garland that I "beefed up" using the Nesters method :)  More mistletoe in the center of that wreath!


Down the hallway I have this shelf


And this mirror, which I added a tiny wreath (#5) to.  The wreath is made from a small piece of leftover garland.


Our bedroom is almost entirely Christmas free...
though I could resist one more kissing ball.
Hanging this was interesting - but necessity is the mother of invention, and I NEEDED this!


So there it is...a day late and a dollar short, but posted just the same!

Linking to It's So Very Cheri!
Related Posts with Thumbnails