Showing posts with label Outside Projects. Show all posts

Monday, September 13, 2010

"sewing"

I know how to sew.
I'm not even bad at it.
But sometimes it's a lot of work.
Dragging the sewing machine out, threading the needle, winding the bobbin (it's always empty!)
Blah, blah, blah.

So when I wanted some sort of fall-themed pillows for my front porch, I decided to sew the easy way.
With my glue gun.
Bonus - I did the whole thing outside :)

I picked up some beautiful outdoor fabric at JoAnn's in the remnant bin. The big piece was about $4, the little piece was only about $2.  I used the pillows that I already had sitting out there and covered them up. I figure I'll just rip open the seams when I'm done with the Fall theme :)

Okay - here we go! Easiest sewing you'll ever do.
To start I folded the fabric with right sides together, then laid the pillow on top of the fabric and cut it to size.

Then I used my hot glue gun to glue two sides together so that only the bottom was open. Here it is after I turned it right side out.

Then I put the pillow in and glued the last edge together.


This is how my final "seam" looks.

Turned out cute, huh?

Honestly, I would never do this for pillows that were going to be inside the house - but for the porch? I love it - quick, easy and cute!

Thursday, July 8, 2010

GOAL!!!

My daughter, Tessa, played Spring Soccer for the first time this year.
She loved it, and was actually very good!
We had a lot of fun with it as a family and went to the park a few times to practice...
But practicing soccer is tough without a goal.

I checked out a mini collapsible goal at Wal Mart, but it was cheesy looking and so light that I figured (staked or not) it would fly across the yard if anyone managed to score a goal! Plus, it was $35.
I checked online and found a plethora of options - none for less than $40, plus shipping.

At this point I (of course) started to wonder about building my own goal...
I figured there HAD to be plans out there to build one out of PVC pipe. We have a large pile of PVC in the garage, left over from our sprinkling system.

Sure enough, I found several plans online.  This one, from This Old House, was my favorite.

I modified it a tiny bit and managed to build a goal for about $6!
Since my garage was full of PVC pipe, I didn't have to buy any of that. I bought a bunch of PVC joints (about $3) and 2 fishing nets from the dollar store.

The nets were the hardest part. The ones from the dollar store are NOT perfectly square. Actually, they're not any particular shape at all. They're sort of amoeba-ish.  So I started by tyeing one net on to the goal in as many spots as I could stretch it to on one end, then I did the same on the opposite side. In the middle I trimmed the nets where it needed it and tied the two of them together. I cut and tied for about 30 minutes and it was tedious - but the money saved was well worth it! $2 was WAY cheaper than I would have been able to buy any other net for.


Tessa will be playing soccer again in the fall, and this season her little brother will get to play, too!

We're all very excited - especially for practice at home :)
 

Monday, June 14, 2010

Sandbox


School is out. My run as PTA president is officially finished!!!
Spring soccer is over.
Girl Scouts is on hiatus.

I'm ready to start blogging again! It's time to regain some of those followers that I lost during my unofficial break.
I miss you, followers! I'm sorry I disappointed you...
(no worries. I might have un-followed me, too!)

Luckily, I HAVE been crafting while I was away! I always make time for that :)
So I have plenty to catch up on. I promise lots of posts this Summer!

Last year my husband and I built this swingset for our children.

At the time, I wanted to put a sandbox in the bottom portion of the tower, but the husband talked me out of it.  He had valid points...it's messy and cats may pee in it, namely.
But now I have a little boy who's almost 4.
There's a world of difference between 2.5 and almost 4. kwim?
The little boy LOVES dirt. LOVES it. He's digging in whatever he can find at this point. I'm already dealing with dirt. And as far as cat pee goes...I don't see very many kitties around here. We're really more of a dog neighborhood.
Mostly, though, I just WANT him to have a sandbox.

So I built one.

I started by cutting out the grass that was growing in the base.

Once all the grass was pulled up I measured the box and cut my lumber.  I used 2x6's and screwed them all together before fitting it into the existing box.

Then I screwed the two boxes together.

After the box was in place I used weed plastic and staples to make sure nothing will grow up through the sandbox.

Then we started filling it.

Our sandbox is pretty small. We used 7 50lb bags of sand in it - 350 pounds! That filled it pretty well, but there are 2 more bags in the garage to be added when we need them.

My last step was to cap off the tops of the boards with 1x4's, to give it a little more of a "finished" look, and to give the kids a spot to sit while they play.

It's a hit! The boy loves it - so does the neighbor girl :)


Linking up all over blogland!
The Girl Creative
Today's Creative Blog
Sugar Bee

Friday, August 14, 2009

Pergola

I've been bugging Matt about a pergola almost as long as I'd been bugging him about a swing set.
I'm a real nag.

So this year I decided it was going to get done. I found myself some DIY instructions on the net, worked out a plan, figured out how much lumber (and in what sizes) to buy, and made a trip to the Home Depot for everything I could get myself.
Then I talked Matt into getting the really long pieces with one of his work trucks, the one with the big rack over the bed :)

We got to work on this project over the 4th of July weekend. By then, Matt was as excited about it as I was (he loves me so much ;)
I put a coat of weather protector/stain on the lumber.
What?! Oh! A camera! Let me sit instead of waving my butt in the air!

We drilled holes into our concrete patio with a special drill and attached these metal post base things.
Asher went nuts over this part - such a boy!


Then we put the posts in.

After this we had a bit of a rough time. My original design had a curve in it, to echo the curve of the patio. Awesome on paper - completely ridiculous in real life. Think things through, people. A curve? Really?
I can't believe we didn't think about how the beams would connect the posts. Duh.
Anyway, I made a modification to the design, but only AFTER we wasted lots of time (over an hour!) trying to make it work.

At this point my neighbor came outside with her little girl and I got distracted. We filled up a kiddie pool and ate popsicles. What can I say? It was a hot day and I needed a break.

Matt was only too happy to work alone (and in peace!) for a while, but no pictures got taken. Oops.
The next day we notched the cross beams for the top using a table saw and attached them to the top using nails. Later Matt put the triangular support pieces on.


Here's the before (as in right before - when we were starting the project)

Here's the after
Gorgeous, right?

I ordered a water mister system online and Matt installed it - it's awesome, but we haven't had much use for it this year, since it's been so cool here lately! I anticipate using it a lot in the future, though. It's almost completely hidden when you look at it from the outside, because Matt mounted it up underneath. He's so clever!
BTW, if you spotted the one dark brown post good for you - you're probably very good at Where's Waldo.
I thought I'd like a dark stain better, so a few weeks ago I painted some on...and didn't like it. Now I just have to figure out how to get it off. Or something.


Wednesday, June 17, 2009

Swingset

For 3 years we've talked about buying a swingset.
Problem was, I wanted a nice one. One of those wood monstrosities that costs a fortune and takes a month to assemble. And every time we decided we'd do it, a reason NOT to would arise.
I mean, seriously...they're gigantic. They're expensive. They're a lot of work to put together.

This year I found a Wal Mart version for just under $400 that looked decent. Not quite as sturdy as one of the more expensive versions, but nice enough. And the website said it was sold in stores. So I asked about it at my local Wal Mart and was helped out by (gasp!) a seemingly competant employee, who checked his computer system and told me that while THEY didn't have any in stock, another local store did.

So we trekked to the other Wal Mart. We found an employee. We waited around for about an HOUR on a Sunday afternoon, while the manager got involved to check the system, make some calls and stroll through what must be a VAST storeroom - only to be told that they do NOT carry the swing set we wanted. The only ones available to us were either very chintzy, or very pricey.
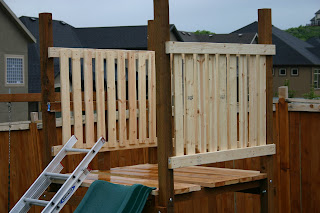
THIS makes me nervous.
Matt thinks I'm a big baby, but I'm always terrified the boards will come out of the back.
This was load 1 of...20?

So we left, dissapointed. And we began talking about designing and building our own swingset, without the benefit of a kit. After all, what would we be missing out on? Pre-drilled holes? Poorly written assembly instructions? Pshaw! As if we needed those things! We are home-improvement masters! Reigning Project King and Queen!
And besides, everyone knows you're paying as much for the convenience of the kit as you are for the materials themselves. We could probably build the whole thing for much cheaper, and have it customized, to boot!
We did all this on day one! Felt really good about our progress and figured we'd be done within the week.
Not so much.

One month and around $600 dollars later (I'm too frightened to add up the Home Depot charges on my online banking to find out the actual total) the swing set is DONE. Mostly.
Honestly, it was worth every penny.
We had a really good time building it. This was a weekend project for Matt and I, and it ended up being put off several times because of bad weather (and once because of allergies so severe poor Matt was pumped full of drugs and confined to the couch with a washcloth over his eyes.) We both really enjoyed working on it when we were able to, though. Matt joked that I had to do everything he did, just to prove I could. That's not really the case, I just like using power tools and thought turning wrenches would be a good way to work my triceps! After all, it works for him :)
The swing section - done and attached! Added a tire swing later :)

It's super-sturdy. We changed plans several times - modifying the layout, the roof, the slide and the swing plan. But we always used the best materials we could buy, and it seems like it would be able to withstand a major earthquake.
There are still a few things to be done. I need to sand and stain the railing, and some brackets need to be added to the stairs. We plan to finish those things this weekend.

The railing and slide are on! Notice how cloudy it is and how the wood is soaked -
told you the weather was crappy!

It's a big hit with my kids - and the neighborhood kids, too! Tessa has made a couple of neighbor friends, and they all love to play on the swing set. The tire swing is especially popular. There are a fw additions I plan to make - I want to add a periscope and steering wheel to the platform, and just yesterday I came up with a chalkboard plan for the lower level that I can't WAIT to attempt. Still, it's fully functioning and the kids LOVE it.

Evidence that they play on it from sunup (pic 1) to sundown (in their jammies!)
Related Posts with Thumbnails