Monday, August 30, 2010

Back to School Bows


Sorry for the long absence!
My daughter went back to school last week, and I was busy preparing for that...
Then I was trying to figure out how to pace my day around drop-off and pick-up...it's always so hard to change your schedule, isn't it?

Every year before school begins I spend a day or two making hair bows.
And every year, but the time Summer rolls around, she's lost them all.
She loves to look pretty, but she loves to PLAY even more, and when she's running and rolling and hiding and seeking on the playground at recess she tends to lose bows. Since I'd rather she play than worry about her hair, I try not to get too irritated by it. And since I sort of like making bows, I keep replacing them.

This year I went overboard. My ribbon collection needed to be cleaned out anyway, and I just kept making them. She ended up with WAY too many to fit in her current bow holder (a rubbermaid 3 drawer storage cube.)

So I decided to make something cute to hold them all, instead :)

I started with a chunky wooden frame (16x20) and a craft kit I found on clearance at JoAnn's.
I forgot to take "before" pictures, so picture the frame an ugly wood tone and the butterfly pieces unpainted.

Once they were painted I attached the butterfly pieces to the frame - making it the center of the bug.

I purchased some rabbit wire at a local farmer supply store. Cut it to size with my wire cutter and attached it to the frame with hot glue.

A note about the rabbit wire - originally I wanted chicken wire (with the people at the farm supply store called Poultry Wire) but it was sold only in large rolls. The rabbit wire was sold by the foot, however, and they had two different sizes on sale for just 0.99 a foot. I bought 3 feet so I'd have some left over in case I decide to make another :)

Here's the result - before she was filled up with bows. I hung it on the wall in my daughters bedroom.

The majority of the bows I've made have the barrette style hair clip on them, as they stay in her hair about a million times better. A few have the alligator, pinch open/close style clip on them. Both stay on the holder very well! The alligator kind just pinches on, and the barrette style just kind of sits on the wire. It stays on perfectly.

I'm sure you noticed the excess of navy blue...my daughter wears a uniform to school, so almost all of her bows have navy and/or white in them to match :)

I really like the way it turned out - it's sweet and girly and functional, too!


Tuesday, August 10, 2010

Mason Jar Soap Dispenser

Recently I added a new folder to my "Favorites"
I called it "To Make"
I'm adding crafts to it like crazy - it's going to be my favorite favorite folder :)

This darling soap dispenser is the reason I created my new folder - and it was the first thing I made from it, too. I just love it so much!

How cute is that?

It's been made by several people, but I went ahead and used Heather's instructions from HeatherBullard.com. They were well written and easy to follow - a huge bonus!

Start with a soap dispenser you like, a mason jar, a drill with whole saw attachment and some epoxy.

Cut the top off your soap dispenser, leaving the threading intact. Measure and drill a whole into your mason jar lid for your bottle top to fit through. Then epoxy them together.


I went with a purple soap. It's blackberry-vanilla scented. Or something.

Anyway, it's lovely! I absolutely adore the way it looks - so cute and fun!


Thursday, August 5, 2010

TrainTableTop

As I promised in yesterdays Birthday Stuff post - here's the gift I "built" my son last week :)

When my son turned two we got him a train table for his Birthday.
It was a huge hit.
But he was definitely too little to set up the tracks himself, and I didn't want to be doing it for him every 5 minutes...
So we took a cue from the toy store and screwed the pieces on to the table.
It worked out perfectly...except he just turned 4, and now he wants the freedom to move the tracks around. Plus, it would be nice if he could use the table for other things as well - like legos or race cars.

The old table top has screw holes in it now, though. Plus the wear and tear on it was pretty significant.
So I decided to replace the top :)

I picked up a very thin piece of plywood - a 4x4 piece of flooring underlayment, actually.
I cut it down myself with a circular saw. I'd never done that before. In the past, my handy-dandy, oh-so-helpful husband has always done it for me. But he was at work, and I'm impatient, and I decided to do it myself. It's a lot harder than it looks.
But I managed!


Then I gave it a coat of apple green spray paint.

When that was dry I started the detail work.
I'm no artist, but I figured my 4 year old wasn't going to be critiquing my work. I gave it a couple of bodies of water, a bunch of rocks, some trees/bushes and a road, of course.

After the detailing was finished I gave it a clear top coat to keep the paint from wearing away too quickly.

For his Birthday this year, we gave Ash a bunch of Hot Wheels race tracks that interconnect. The new train table is the perfect place to set them up! It's wonderful being able to use the table for more than just trains. Here are my kiddos, in their jammies, playing on the new table :)

Wednesday, August 4, 2010

Birthday Stuff

I know "Birthday Stuff" is an awful post title. I can't think of anything else!

August 1 was my son's 4th Birthday. His party was July 31. All last week I was busy with...well...Birthday Stuff!  Apologies for neglecting the blog. I'm back now, ready to share everything I was working on for my boy last week!

The Invitations
I purchased the card and the beach balls at a local scrapbooking store, then printed them at home. This is how I make most of my invitations. It's not much more expensive than buying the ready made ones and filling them in, and I love the custom look. These ones ended up costing less than a dollar each :)

The Favors
I love a theme, and I wanted to keep everything really summery - sun, water, sand. When I found these miniature sand buckets on clearance for .48 at Target I knew they were perfect.  I purchased mini water guns, water balloons and some splash balls at Dollartree and used a piece of teal tissue paper to fill up space. Each bucket cost about $1.00
Bucket $0.48
Splash Balls $0.25 (4/$1)
Water guns $0.16 (6/$1)
Water balloons $.04 (100/$1)
Tissue Paper $.06 (8 sheets for $1, 1/2 sheet per bucket)
Total $.99

I printed "Thanks 4 Coming to my Birthday Party" at home and matted it with cardstock.

The Cake
I found a Sun Cake on the Wilton website that I thought would work perfectly and managed to recreate it pretty well! I baked the cake in a large glass bowl rather than buying the soccer ball pan Wilton recommends. It turned out perfectly :)
I used this recipe from bakerella and made my own buttercream - my boys favorite :)

The Wardrobe
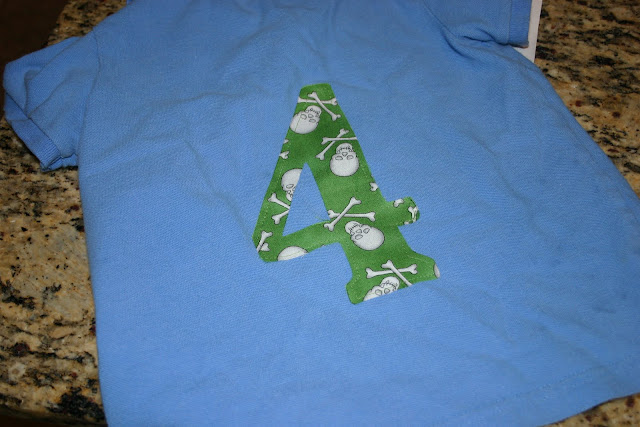
We rented a blow-up-waterslide for the party, so my wardrobe choices were limited to swim wear. I did make a custom "4" appliqué for the back of a polo shirt for my boy to wear during dinner, though.
If you haven't made your own appliqué yet, get going on that! They are easy and fun.
Just cut your design out of fabric and fusible web (like wonder under) and iron on. Then follow the outline with your sewing machine. There are machines with fancy embroidery type stitches that you can use especially for this type of thing, but if you don't have one of those you can use a regular sewing machine - I do! Sometimes I zig-sag stitch, sometimes I just sew a straight line. If you don't completely cover the edges of your fabric it will fray when you wash it, but depending on the design that can actually look really cute.
My son picked out his own fabric - bright green with skulls. I loved it.
I chose a font and printed a 4 off my computer for a pattern. Then I ironed it on and did a regular stitch around the outside. LOVE how it turned out - although he only wore it for about 10 minutes. I haven't washed it yet, but this is one that will fray, and I think it will be darling :)


So that's it for the party itself. There was one other Birthday project, a gift I "built" that I'll share tomorrow.

Related Posts with Thumbnails