Monday, November 16, 2009

Skirt Dress

I've never posted so many times in such a short period of time!
I really wanted to join the Cottage Instincts  "made it with what i had" party, though - so I'm back with one more project :)

I've had this skirt for years.  It still fits fine, and my husband liked it, but I always feel ridiculous when I wear it.
It's not really my style.
I bought it thinking it would be cute with flip flops for a trip to the park or the zoo...
In reality, the pink stripes are little girl-ish and I feel like I'm trying to look younger than I am when I wear it.

Here it is on me - I took off my sweats to put it on for the picture (still wearing the hoodie!) LOL


I measured how big around it would have to be to fit my daughter (7 years old, but a little small for her age) and cut off the extra.
 

I used those pieces to make straps for the dress.  I started off trying to make a ruffle sleeve, but my sewing skills are remedial at best and I gave up after an hour of screwing around with it.


Sewed the whole thing back together, attached the straps and ta-da!
A dress for my sweet girl :)


(those are her clothes wadded up in a ball on the floor behind her - should have moved those!)
I should take a picture of her with it on over a long sleeve shirt - that was the intention for winter.  Maybe when she gets home from school today I'll do that.


This was SO easy.  The skirt was from the misses department at Mervyns a million years ago - it was a size medium.  It made a size 6x-ish dress perfectly.  If you have any old skirts consider making them into little girl dresses! It's a super fun, fast project :)
and...


Kids Bathroom Redo

When we moved into our home (just over 3 years ago) I didn't want the hall bathroom - the one the kids use - to be a "kid" bathroom.
I love those kid bathrooms - but only when they are actually dedicated kid spaces.

Mine was a hall bathroom - the bathroom guests would be using.  I felt like it needed to be "adult" in it's decor.

Fast forward to now - things have changed. I no longer work outside the home, my life revolves around my kids.  And I no longer care if my (childless adult) guests giggle a little at my hall bathroom.  Two children use it every day and I want it to be bright and happy for them - not the boring neutral that it's been for way too long.

Before:


Model Home-ish, wouldn't you say? Except a Model Home would have had something nice hanging above the toilet. I always meant to hang something there, but never could find anything I liked.

To start, I decided to install beadboard.
I've had a beadboard obsession for longer than I can remember - yet I've NEVER installed it in a room.  The bathroom is small, so I figured it was a perfect place to start - nice and easy :)
Once I knew beadboard was going in, I chose a paint color.  I wanted something bright, and lately I'm having a thing for green.  I chose a Behr color called Grape Leaves.

Here are the After picture -


I purchased this adorable shower curtain at Target.


I already had a stack of brightly colored towels that matched the colors in the curtain perfectly.  I sewed little ribbon loops onto them to hang them on the new towel hook I installed to replace the old towel bar with.
 

The shutter is actually an interior shutter that I found for CHEAP on KSL.com (our local - better traveled -version of Craigslist.)  I painted it with an oops paint in the most gorgeous shade of turquoise and distressed it.


The sign hanging on the front is made from a scrap of beadboard and hand painted by me.  I'm not sure I LOVE it.  It might be replaced in the future.  We'll see.


The shelf is another project that I'll share in the future.  The accessories on it I already had.


I framed out the mirror with molding and corner pieces.  Love the way it turned out!


The whole re-do was SO cheap!
I bought a gallon of paint for $25 (only used half)
2 sheets of beadboard for $33 (I got one for 50% off because it was damaged at one end)
The molding, liquid nails and silicon for less than $30
The shower curtain was $20
The new towel hook was $3
The shutter was $1.25
The shelf was about $4
Total was about $100!

The counter top flower arrangement thing is made from stuff I already had.  I'm not sure I love it.  Thoughts?


Is it good, bad or ugly?

Linking up to The Room a Month party at Shades of Pink
and to Metamorphosis Monday at Between Naps on the Porch
and to It's So Very Cheri's It's So Very Creative party!

Sunday, November 15, 2009

Useless (budget) Decor

A few weeks ago at the thrift store I spied this ugly brass thing.


I'm not exactly sure what it was intended to be, but to me, it looked like a candle should sit on it.
I paid $2 for it and brought it home, where it sat in my garage for a week or so.

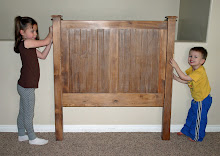
This thing is strangely sized. It's about 3 feet tall.  I took a picture of my boy next to it, so you all could see.
(Keep in mind, this was a picture for sizing reference only. The boy is barefoot and still in (non-matched) jammies and he's eating something...I'm not sure what.  I promise I'm a good mom. Don't judge me from this photo.)


I gave my brass monstrosity several thin coats of Heirloom White spray paint, until it was sufficiently covered.


When it was completely dry, I dried out the glaze that I've been hearing so much about.
Rubbed it on, rubbed it off.  Sure enough, it gave my strangely shaped candle stick some lovely depth.


Tough to see that depth from far away.  Here are some close ups.


Pretty, huh?

I found a pretty pillar candle at Target and slapped it on top. Then I tried to find a spot it could sit.


It ended up outside, where I think it looked quite pretty.


Useless decor.  The Pottery Barn want's $89 for this one


http://www.potterybarn.com/products/floor-standing-candlestick/?pkey=ccandleholders

I paid $2 for mine :)

Unfortunately, the weather has turned and I had to bring it inside today.  I'll find a spot for it in my bedroom or bathroom, I think - since it was in the PB bed/bath catalog.  God bless the Pottery Barn - who would I copy cat if it weren't for them?

Winner # 2!

Since Sandy never got in touch with me (sorry, Sandy!) I used random.org to choose a new winner today.

Lucrecia is the new winner!
and her blogger profile even has her email address.  Yay!
I've sent you an email and will get your prize in the mail this week.

Thanks again to everyone who entered!

Thursday, November 12, 2009

Winner!

Winner, winner, chicken dinner!
(name that movie)

I enjoyed my first giveaway SO MUCH!
Expect another one in the near future. These things could be addictive!

...and the winner is (drumroll, please)
SANDY!
Sandy (comment #71) said:

Sandy said...

Wow those are fabulous. Thanks for the great idea. I'm a new follower


Sandy, you didn't leave an email address and your blogger profile doesn't show a blog, so I'm not sure how to get in touch with you.
If I haven't heard from you in 48 hours I'll use random.org to generate another winner.

Thank you everyone for entering!

Wednesday, November 11, 2009

"lazy" Susan


I think Susan got a bad rap.
Why call the girl "lazy" when really she was brilliant?
Must have been a man that named her genius creation.

ANYWAY...
Our old table had a built in Susan (I, for one, will cease to call her lazy) in the center.  It was a round table, a real cutie that functioned well for our little family of four. The problem was that there are often more people eating around our table than just us four.  So this summer I refinished a large table and we have loved it.
I've missed Sue, though.
Plus, the basis for most of my inspiration/imitation - Pottery Barn - had a few in their fall catalog that got me thinking.  Nothing was for sale, of course. I often seem to fall in love with the staging elements.
This was the picture that had me drooling over my rotating girlfriend.


So I've had my eyes open for a Susan at the thrift store for a few weeks now.
Recently, I found one of the Ikea variety.  I paid $3 for it - it was unblemished and in like new condition, and they go for $8 at Ikea, so I figured it was a good deal.


This shiny, scratch free blond oak Swedish styled Susan was not exactly what I had in mind, though.


I started out by sanding her down.
I wanted to rough up the surface so that paint would stick, but even more importantly, I wanted to break down the edges.  I wanted something that resembled a rough bevel, so it had a hand-carved look to it.
Because I'm sure that somewhere, elderly master-craftsman types sit around, whittling lazy Susan's...


Once the sanding was to my liking I brushed on a quick coat of creamy Behr paint.


When that was dry I sprayed her down with some flat black Rustoleum.


After she was thoroughly dry I went nuts with the sand paper.  I started with 120 grit (my favorite) and ended with a sanding block that probably started as 220, but has been used so much that it has very little "sand" left to it.  It gave everything a nice polish, kind of worked the scratches into the piece.


I love how it turned out. I'm really hoping to find another so I can give it the same treatment - then I'll have one for each end of my Thanksgiving table!


Thursday, November 5, 2009

Under Cabinet Love

This a project that's not normally what I would deem worthy of a post.
However, since I used Gorilla Glue and since Ashley and Whitney (at Shanty2Chic) are having a Gorilla Glue party, I thought I'd go ahead and mention it.
The awesome prize they are offering up might have enticed me to enter ;)


Anyway - underneath my bathroom sink is a nightmare.
My sister is a hairstylist. She gets to buy all the fun, professional products she wants at a hefty discount, because of her cosmetology license.
I am a bit of a product junky.
I love hair stuff, nail polish, lotions, creams, bubble baths...
My collection was out of control, and spilling into my husbands cabinet, too.
I have FOUR different liter-sized Bed Head Duo's.  They are all different formulations...moisturizing, straightening, curling, clarifying...

I love me some Bed Head.

The other night I was in the shower and I asked my husband to grab me a different shampoo from under the sink.  It took him 10 minutes to find what I wanted, and some things may have been thrown around by him.  He may have said some naughty words.

Yesterday, I decided I really needed to purge.  Surely there must be a few things that I didn't need down there, right?

Not so much.
I think I threw away 3 empty packages and...that's it.
So I decided that a shelf was in order!

You don't get a true "before" photo - you couldn't have PAID me to take a picture of that mess.
Trust me, it was bad.


Much of my product is NOT in the picture.  It was behind me, on top of the counter, in the other room...lots of places.


Because I didn't want to mess around with cutting around all the plumbing, I decided to place my shelf on the side of the cabinet rather than across the back.
I cut a piece of spare wood to size to use as my shelf, and a couple of 1/4 scraps to use as supports.  I also cut one to use as a leg in the front.

I used Gorilla Glue Super Glue to set the leg to the shelf while I nailed the supports to the cabinet walls.  Then I used more gorilla glue super glue to affix the shelf to the supports on the wall and the leg to the cabinet floor (so it wouldn't move around!)
After the glue had dried I used a couple of nails to make sure the shelf was secured to the supports and the leg was secured to the shelf.
It was super easy to hammer everything in since the glue was already set!


And now...my cabinet is gorgeous!


Related Posts with Thumbnails