Wednesday, June 24, 2009

Parlor re-dec

I have this room in my house...
This strange, semi-formal wasteland when you walk in the front door.
Sometimes we call it the living room, sometimes we call it the front room. Its the room that I imagine little old ladies in Georgia call "the parlor."

I hate this room.
It's wasted space. And - in my house - it was ugly, too.
In a perfect world I'd knock down the wall between my kitchen and this 'front room' would be absorbed by a new, massive kitchen/dining area. It would be beautiful, functional space with none of the ridiculous characteristics of the current room. It would be used often and enthusiastically. It would be perfect.
It would also cost a fortune. I'm thinking a minimum of a million-billion dollars. Or something like that. More than we can afford, at any rate.

Here is the eye-sore that is (was) my front room.

I don't often take pictures of it - you might be able to tell how old this one is by the baby in the background. That's Ash. He'll be 3 in a couple weeks.
I'm not sure why there are folding chairs and a table against the wall, or what's in the bag on the floor. I think the picture was supposed to be of the new (at the time) color on the wall. I think I was deciding if it was too orange-y (it was.) But I can't really be sure about any of that.


This was the layout.
BORING.

Obviously something had to be done.
We love to read, and we have a ton of books. At our old house, we had book shelves in our front room. At this house, those shelves were sitting in the basement, collecting dust (and various homeless items.) Problem was, the color definitely didn't work with the new place.
I looked into buying new shelves, but frankly, wasn't interested in spending the money.
So instead, we gave them a make-over.

The before shelf:

I picked out a color called Espresso and bought several cans to cover the 4 bookshelves that we had. Since the shelves had a laminate finish and I was concerned about the paint 'sticking', I also bought several cans of primer.
Lastly, I bought 6 strips of long decorative molding - 2 strips each of MDF crown molding and baseboard and 2 strips of real wood decorative door casing.
Then I talked Matt into helping and we set it all up in the garage. I gave the shelves a VERY quick, VERY light sanding and then went nuts with the spray paint.

They ended up taking several coats. I think we spraypainted every few hours for almost a week. Pretty intense. The fumes were, I mean.
At the end, though, they were gorgeous.
We moved them in and set them up against the wall. I used brackets to secure them to the wall, then attached the molding to the front of the shelves with L brackets.

The molding really helped make them look like one large (expensive) unit.


This one corner of molding doesn't match up perfectly - but I swear, you don't even notice it.


Once they were in place I got down to business shelf-scaping.
I wanted most of the space to be taken up by books, but didn't want a big wall of monotony. After all, the purpose of this redecoration was to get rid of the boring.
I tried to use stuff I had around the house for the most part, but couldn't resist buying some fun new things. Strangely, they all turned out to be bird themed. Must be the Nester's influence.

Speaking of the Nester - I also mistreated the windows. Because the sad little curtains you saw in the before pictures were AWFUL.


I built two simple frames out of 1x2's and bought some beautiful home decor fabric (the name is pumpkin courtyard. I loved it, so I remembered it) to stretch accross them. The art in the middle came from TJ Maxx - love it :)

Other than those things, most of the re-dec consisted of moving furniture around - some came from other rooms - and one more BIG project, which I'll post seperately.

The after of this room turned out even better than I had hoped. It's so much prettier than before! It's less formal, but more purposeful. It's both warmer and cooler...it finally looks done. I love it.

From the front door:

From the kitchen:

The new layout:
I'll share the last piece soon!


Wednesday, June 17, 2009

Swingset

For 3 years we've talked about buying a swingset.
Problem was, I wanted a nice one. One of those wood monstrosities that costs a fortune and takes a month to assemble. And every time we decided we'd do it, a reason NOT to would arise.
I mean, seriously...they're gigantic. They're expensive. They're a lot of work to put together.

This year I found a Wal Mart version for just under $400 that looked decent. Not quite as sturdy as one of the more expensive versions, but nice enough. And the website said it was sold in stores. So I asked about it at my local Wal Mart and was helped out by (gasp!) a seemingly competant employee, who checked his computer system and told me that while THEY didn't have any in stock, another local store did.

So we trekked to the other Wal Mart. We found an employee. We waited around for about an HOUR on a Sunday afternoon, while the manager got involved to check the system, make some calls and stroll through what must be a VAST storeroom - only to be told that they do NOT carry the swing set we wanted. The only ones available to us were either very chintzy, or very pricey.
THIS makes me nervous.
Matt thinks I'm a big baby, but I'm always terrified the boards will come out of the back.
This was load 1 of...20?

So we left, dissapointed. And we began talking about designing and building our own swingset, without the benefit of a kit. After all, what would we be missing out on? Pre-drilled holes? Poorly written assembly instructions? Pshaw! As if we needed those things! We are home-improvement masters! Reigning Project King and Queen!
And besides, everyone knows you're paying as much for the convenience of the kit as you are for the materials themselves. We could probably build the whole thing for much cheaper, and have it customized, to boot!
We did all this on day one! Felt really good about our progress and figured we'd be done within the week.
Not so much.

One month and around $600 dollars later (I'm too frightened to add up the Home Depot charges on my online banking to find out the actual total) the swing set is DONE. Mostly.
Honestly, it was worth every penny.
We had a really good time building it. This was a weekend project for Matt and I, and it ended up being put off several times because of bad weather (and once because of allergies so severe poor Matt was pumped full of drugs and confined to the couch with a washcloth over his eyes.) We both really enjoyed working on it when we were able to, though. Matt joked that I had to do everything he did, just to prove I could. That's not really the case, I just like using power tools and thought turning wrenches would be a good way to work my triceps! After all, it works for him :)
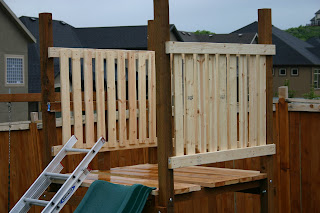
The swing section - done and attached! Added a tire swing later :)

It's super-sturdy. We changed plans several times - modifying the layout, the roof, the slide and the swing plan. But we always used the best materials we could buy, and it seems like it would be able to withstand a major earthquake.
There are still a few things to be done. I need to sand and stain the railing, and some brackets need to be added to the stairs. We plan to finish those things this weekend.

The railing and slide are on! Notice how cloudy it is and how the wood is soaked -
told you the weather was crappy!

It's a big hit with my kids - and the neighborhood kids, too! Tessa has made a couple of neighbor friends, and they all love to play on the swing set. The tire swing is especially popular. There are a fw additions I plan to make - I want to add a periscope and steering wheel to the platform, and just yesterday I came up with a chalkboard plan for the lower level that I can't WAIT to attempt. Still, it's fully functioning and the kids LOVE it.

Evidence that they play on it from sunup (pic 1) to sundown (in their jammies!)

Monday, June 8, 2009

Yearbooks

Last week I made yearbooks for Tessa's first grade class.  It was my last project as Room Mom - bittersweet!  
They turned out really cute.

Front:

Inside:

Back:

Each student answered a questionnaire - their answers were really cute.  I printed that next to their picture (which I took when they finished their questionnaire.)
The front picture is the whole class on the steps at school.  The back picture is the group making silly faces.  
I bound the book with ribbons.  After I took the picture I added a tag to each book that the kids could write their names on.  On the last day of school they passed them around and had their friends and teachers sign them.  So cute!
I could have done a lot more - I have hundreds of pictures from class parties through out the year that would have been really fun to add - but I didn't think about doing that until after I was finished.  Maybe next year.

This was a really fun, easy project and the teacher and students really seemed to love it.

Friday, June 5, 2009

Scrabble Tiles

I'm seeing a big scrabble-tile trend in crafting.  Seems like those little wooden tiles are being used by everyone for everything!
I saw some on Etsy that were actually used as scrabble tiles for decor.  
I'm a big fan of Scrabble, and I fell in love with the idea of using the letters as decorative accessories.

Actually - when we got pregnant with Tessa I used a scrabble board and glued the letters on to spell out "We're having a baby" to announce it to my family.  It didn't end up working out...they knew before I actually brought the game board around...but that's another story.

Anyway, back to the crafting.
I saw some darling pieces on Etsy and, as is my M.O., I set out to plagerize the idea.
(often people tell me "you're so creative!" - not so much.)

This one is sitting on the bookshelves in my front room - LOVE IT.

This one was an end-of-the-year gift for Tessa's teacher.  I think it will be so cute sitting on her desk!  Hope she likes it.
Related Posts with Thumbnails